2014 Ram 1500 Headlight Bulb Replacement Guide & Sizes
To replace bulbs on a 2014 Ram 1500, you must first identify if you have Quad or Projector housings, as they use different bulb sizes. Accessing the bulbs requires removing the front grille and a hidden locking tab located behind the wheel well liner. Always use gloves or a clean cloth to handle new bulbs to prevent premature failure from skin oils.
🎯 Key Takeaways
- Takeaway 1:Confirm your housing style (Quad or Projector) before purchasing replacement bulbs.
- Takeaway 2:Quad low beams use H11, while Projector low beams require 9012 bulbs.
- Takeaway 3:A 10mm socket and T25 Torx bit are mandatory for this job.
- Takeaway 4:Accessing the rear locking tab through the wheel well is the most difficult step.
- Takeaway 5:Ensure any LED upgrades include CANBus decoders to prevent dashboard error codes.
Replacing the headlight bulbs on your 2014 Ram 1500 is more involved than a simple “plug and play” swap. Unlike many older trucks where you can reach behind the housing from under the hood, the 4th Generation Ram requires you to remove the front grille and the entire headlight assembly to access the bulb sockets. This design choice means a simple bulb burnout can turn into a 45-minute project involving tools and “blind” mechanical releases hidden inside the wheel well.
Properly identifying your housing type before you start is critical. The 2014 model year utilizes two distinct headlight styles—Quad and Projector—which use completely different bulb sizes and locking mechanisms. Attempting to install a Projector-style bulb into a Quad housing will not work, and you do not want to realize this after you have already disassembled the front end of your truck. This guide provides the exact specifications and the physical steps needed to navigate the hidden clips and mounting bolts safely.
Identifying Your Headlight Type: Quad vs. Projector Housing
Before ordering parts, you must look closely at your headlight lenses. RAM used two different suppliers and designs for the 2014 model year, and they are not cross-compatible without wiring adapters. If you have the wrong bulb on hand when the grille comes off, you will be stuck with an immobile truck until you get the correct replacements.

The Quad Headlamp Design
The Quad headlamp is the standard option found on most Tradesman, Express, and SLT trims. You can identify this style by the two distinct chrome reflector bowls inside the housing. The top bowl is for your low beams, while the bottom bowl is for your high beams. In this setup, two separate bulbs handle the lighting duties. If your headlight has a clear, open view of the bulbs through the plastic lens without any glass magnifying “eyeball,” you have the Quad system.
The Projector Headlamp Design
Projector headlamps were standard on premium trims like the Laramie, Longhorn, and Limited, though they were optional on some Sport models. These are easy to spot because they feature a large, circular glass lens (often called a “fish-eye” lens) that focuses the light beam. Additionally, Projector housings usually feature an amber LED turn signal strip along the bottom. Unlike the Quad system, the Projector housing uses a single bi-functional bulb to handle both high and low beam functions via an internal mechanical shutter.
- Quad Style: Two bulbs per side, no glass lens, stacked vertical reflectors.
- Projector Style: One main bulb per side, glass magnifying lens, LED accent strip.
2014 Ram 1500 Headlight Bulb Replacement Made Easy: Your Essential Action Plan
Replacing the headlight bulbs on a 2014 Ram 1500 can be a daunting task for many truck owners because, unlike older vehicles, the process requires more than just reaching behind the housing. This guide covers the complete procedure for accessing the headlight assembly, safely removing the bulbs, and ensuring your lighting system is restored to peak performance. Following these steps correctly is vital to avoid breaking expensive plastic clips, stripping mounting bolts, or contaminating your new bulbs with skin oils, which can lead to premature failure. Whether you have the Quad-style or Projector-style headlights, this walkthrough will give you the confidence to handle the job in your own driveway.
Step 1: Preparation and Tool Selection
What you need: Replacement bulbs (H11 for Low Beam Quad, 9005 for High Beam Quad, or 9012 for Projector housings), 10mm socket and ratchet, flat-head screwdriver or trim removal tool, and a pair of clean nitrile gloves.
Instructions: Before you begin, ensure your vehicle is parked on a level surface with the engine off and the parking brake engaged. Turn the headlight switch to the “Off” position. Open the hood and locate the plastic radiator shroud covering the top of the grille. It is essential to wear nitrile gloves during this entire process. The oils from your skin can create “hot spots” on the quartz glass of the new halogen bulbs, causing them to shatter or burn out within weeks. Organize your tools nearby and ensure you have the correct bulb type by checking your owner’s manual or the markings on the existing housing. Clear any debris from the engine bay to prevent it from falling into the headlight cavity during the removal process.
Pro Tip: If you are working on the driver’s side, turning your steering wheel all the way to the right can provide more clearance within the wheel well for later steps. Conversely, turn it to the left when working on the passenger side.
Step 2: Removing the Radiator Shroud and Grille Bolts
What you need: Trim removal tool or flat-head screwdriver, and a 10mm socket.
Instructions: To access the headlight housing, you must first create space by loosening the top of the grille. Locate the plastic push-pins holding the large black radiator shroud in place above the grille. Carefully pry up the center of each pin using your trim tool, then pull the entire pin out. Set these aside in a magnetic tray or a cup so they don’t get lost. Once the shroud is removed, you will see four 10mm bolts securing the top of the grille to the radiator support. Use your ratchet to remove these bolts. You don’t necessarily need to remove the entire grille, but loosening it allows you to pull the plastic trim slightly forward, providing the clearance needed to slide the headlight assembly out without scratching the paint or the lens.
Pro Tip: Be gentle with the plastic push-pins. They become brittle over time due to engine heat; if one snaps, they are inexpensive to replace at any local auto parts store.
Step 3: Accessing the Hidden Wheel Well Panel
What you need: A small flat-head screwdriver or your fingers.
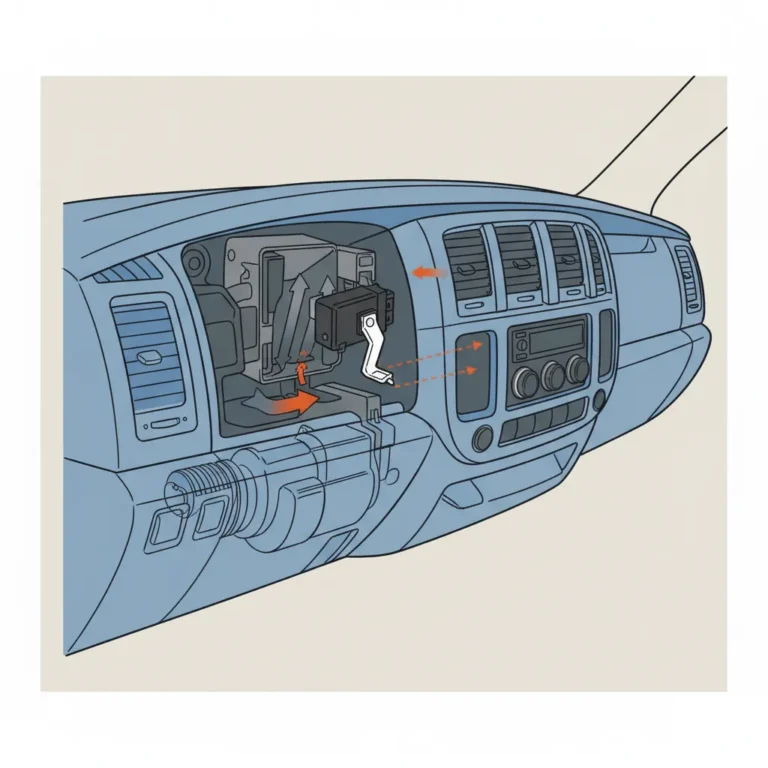
Instructions: Ram engineers included a “hidden” access door inside the front wheel wells specifically for headlight maintenance. Locate the small rectangular plastic flap on the inner fender liner, positioned directly behind the headlight assembly. Pop the retaining clip and slide the door open. Reach your hand through this opening into the dark cavity behind the headlight. You are feeling for a white plastic sliding lever. This lever acts as a secondary lock for the headlight housing. Push the lever UP (away from the ground) to unlock the assembly. You should hear or feel a distinct “click” as the locking pin releases. Without performing this step, the headlight will remain firmly attached to the frame, and attempting to pull it out by force will break the mounting tabs.
Pro Tip: If the white lever is stuck due to road grime or salt, spray a small amount of silicone lubricant through the access door to loosen the mechanism before forcing it.
Step 4: Unbolting the Headlight Assembly
What you need: 10mm socket with an extension.
Instructions: Return to the front of the vehicle. Each headlight assembly is held in place by two primary 10mm bolts. The first bolt is located at the top of the housing, easily visible once the radiator shroud is out of the way. The second bolt is tucked slightly deeper, often located near the bottom inner corner of the housing, partially obscured by the grille trim. Use your 10mm socket and a 6-inch extension to reach and remove these two bolts. Keep a firm grip on the housing as you remove the last bolt to ensure it doesn’t tilt forward and fall. Note that even with the bolts removed and the wheel well lever unlocked, the housing is still held by a ball-and-socket friction fit on the outer edge near the fender.
Pro Tip: Place a piece of painter’s tape on the edge of the bumper directly below the headlight. This prevents the sharp plastic edges of the housing from scratching your paint during removal.
Step 5: Extracting the Housing and Disconnecting Wiring
What you need: Both hands and a steady pull.
Instructions: Grasp the headlight housing firmly with both hands. Pull the assembly straight forward toward you. You will need to use a moderate amount of force to pop the ball-stud out of its plastic socket on the fender side. Once the unit is loose, do not pull it too far away from the truck, as the wiring harnesses are still connected. Locate the main electrical connector at the back of the housing. Press the release tab on the wiring clip and pull it away from the assembly. If your truck has turn signal or side marker bulbs integrated into the same unit, you may need to disconnect those as well. Carefully set the entire headlight assembly on a soft surface, like a towel or a workbench, to avoid scuffing the clear lens.
Pro Tip: If the wiring harness is stubborn, use a small flat-head screwdriver to gently depress the locking tab while pulling the connector. Never pull on the wires themselves.
Step 6: Replacing the Bulbs
What you need: New bulbs and nitrile gloves.
Instructions: On the back of the housing, you will see circular plastic dust caps. Rotate the cap counter-clockwise to remove it and expose the bulb. For the low beam (usually the outer bulb), grasp the plastic base and rotate it roughly 45 degrees counter-clockwise to unlock it from the reflector. Pull the old bulb out. Take your new bulb—ensuring you are wearing gloves—and align the three metal tabs on the bulb base with the slots in the housing. Insert the bulb and rotate it clockwise until it locks firmly in place. Reinstall the plastic dust cap by twisting it clockwise until it seats against the rubber gasket. If the gasket on the dust cap looks cracked or dry, apply a tiny amount of dielectric grease to ensure a moisture-tight seal.
Pro Tip: While the housing is out, check the other bulbs (high beam, turn signal). It is often worth replacing them all at once since the labor to remove the housing is the most time-consuming part.
Step 7: Testing and Reinstallation
What you need: 10mm socket and the removed bolts/pins.
Instructions: Before bolting everything back together, reconnect the wiring harness to the back of the housing. Turn on your truck’s headlights to verify that the new bulb illuminates correctly. Check both low and high beams. Once confirmed, tuck the wiring neatly and slide the headlight assembly back into the chassis. Ensure the ball-stud on the outer edge clicks back into its socket. Replace the two 10mm mounting bolts. Reach back through the wheel well access door and pull the white locking lever DOWN to secure the housing. Finally, reattach the grille bolts and the plastic radiator shroud using the push-pins. Give the housing a gentle shake to ensure it is rigid and properly seated.
Pro Tip: If the new bulb doesn’t light up during the test, check the connector for corrosion or ensure the pins aren’t bent. Occasionally, aftermarket LED or HID replacements require specific polarity; try flipping the plug 180 degrees if applicable.
✅ Final Checklist
- Confirm the white locking lever in the wheel well is pulled DOWN into the locked position.
- Verify that the plastic dust caps on the back of the housing are tight to prevent moisture/fogging.
- Ensure all four 10mm bolts (two for the headlight, four for the grille) are tightened snugly but not over-torqued.
- Check that all plastic push-pins are fully seated in the radiator shroud.
- Perform a final light check, including turn signals and high beams, to ensure no wires were pinched.
Important Notes:
- Safety Warning: Always allow bulbs to cool for at least 10 minutes before touching them, as they reach extremely high temperatures during operation.
- When to Seek Help: If you notice melted wiring harnesses or heavy corrosion in the sockets, consult an automotive electrician. Also, if your headlight alignment seems off after installation, you may need a professional to adjust the vertical aim screws.
- Estimated Time: 45 to 90 minutes depending on experience.
- Cost Range: $20 – $100 depending on whether you choose standard halogen, high-performance halogen, or LED upgrade bulbs.
Comprehensive 2014 Ram 1500 Bulb Size and Specification Chart
Once you have identified your housing type, you need to select the correct bulb size. The 2014 Ram is particularly sensitive to voltage changes. If you are switching to LEDs, ensure they are CANBUS-ready to avoid the “bulb out” error on your dashboard or the common flickering issue known to plague 4th Gen Rams.
Bulb Sizes for Quad Headlight Housings
The Quad system uses separate bulbs for the upper and lower sections. Because these bulbs sit in open reflectors, it is vital to use bulbs with the correct focal length to avoid blinding oncoming traffic.
- Low Beam: H11 (Standard 55W)
- High Beam: 9005 (Standard 65W)
- Turn Signal/Parking Light: 3157NA (Amber)
Bulb Sizes for Projector Headlight Housings
The Projector system is more specialized. It uses a high-output single-filament bulb for both beams. Many owners mistake these for standard 9006 bulbs, but the 2014 Projector specifically requires the 9012 (HIR2) bulb for proper fitment and light output.
- Main Beam (High/Low): 9012 (also known as HIR2)
- Turn Signal: 3157NA or integrated LED (Check your specific trim)
- Sidemarker: 2825 (W5W)
Fog Light Bulb Sizes
While the headlight housings vary, the fog lights also have two possibilities depending on the orientation of the housing in your bumper. Check if your fog light lens is vertical or horizontal.
- Vertical Fog Lights: 9006 (Standard on most 2014 steel bumpers)
- Horizontal Fog Lights: 2504 (PSX24W) (Common on Sport/Express plastic bumpers)
Step-by-Step Removal: Accessing the Headlight Assembly
To replace the bulbs, the entire headlight housing must be pulled forward and out of the truck. This requires removing the radiator shroud and the grille first. You cannot simply reach through the engine bay, as the 2014 frame and airbox block all access to the rear of the housings.
Step 1: Remove the Radiator Shroud and Grille
Open your hood and locate the large black plastic shroud covering the gap between the grille and the engine. This is held in by roughly six to eight plastic push-pins. Use a flathead screwdriver or a trim removal tool to pop the center of the pins up, then pull the entire clip out. Set the shroud aside.
Next, locate the four 10mm bolts securing the top of the grille to the radiator support. Once these are removed, the grille is only held in by snap-clips along the bottom. Stand in front of the truck, grab the bottom of the grille firmly, and pull straight toward you with a quick, even tug. You will hear a loud “pop” as the clips release. Set the grille on a soft surface to avoid scratching the chrome or paint.
Step 2: The “Blind” Access Through the Wheel Well
This is the step that most owners miss. There is a hidden 10mm bolt and a plastic locking slider that must be accessed through the front wheel well. Turn your steering wheel all the way to the opposite side of the light you are working on to create space. Inside the wheel well liner, you will see a small rectangular access door. Pop this door open.
Reach inside the hole. You will feel a white plastic slider. This is a vertical locking tab. Push this white slider UP to unlock the back of the headlight housing. If it feels stuck, wiggle the headlight housing from the front of the truck while pushing the slider. Additionally, there is a 10mm bolt located just above this slider that must be removed through this access hole. This bolt secures the lower mounting arm of the headlight assembly to the truck’s frame.
Necessary Tools and Pre-Installation Safety Measures
Before you dive into the engine bay of your 2014 Ram 1500, having the right gear on hand will save you from unnecessary frustration. This truck is famously rugged, but some of the headlight housing fasteners require specific tools to reach without cracking the plastic trim or losing a bolt down into the bumper abyss.
The Essential Tool Kit
While most modern vehicles are moving toward tool-less designs, the 2014 Ram still requires a few basics. You won’t need a professional-grade chest, but make sure you have these items ready on your workbench:
- 10mm Socket and Ratchet: This is the “magic” size for almost every bolt holding the grille and headlight assembly in place.
- Long Extension Bar: You will need at least a 6-inch extension to reach the lower mounting bolts through the wheel well access port.
- Trim Removal Tool or Flathead Screwdriver: Useful for popping out the plastic rivets on the radiator shroud.
- T25 Torx Bit: Depending on your specific trim level or if you have aftermarket fender flares, you might encounter these star-shaped screws in the wheel well.
Pro Safety and Handling Tips
Safety isn’t just about protecting yourself; it’s about protecting your new investment. Never touch the glass of a new halogen bulb with your bare fingers. The natural oils from your skin create “hot spots” on the quartz glass, which can cause the bulb to shatter or burn out prematurely once it reaches operating temperature. If you do accidentally touch it, clean the glass thoroughly with rubbing alcohol before installation. Additionally, always ensure your ignition is off and your headlight switch is in the “O” position to prevent any minor electrical surges while you are handling the wiring harnesses.
Choosing Between Halogen, LED, and HID Upgrade Options
Deciding which technology to put into your 2014 Ram 1500 depends on your budget and how much night driving you actually do. While the factory halogens are dependable, they often leave owners wanting more “throw” and a modern aesthetic. However, the Ram’s electrical system can be picky about what you plug into it.
Halogen vs. LED: What Fits Best?
Standard halogen bulbs are the safest bet for a “no-headache” installation. They are inexpensive and guaranteed to work with the truck’s computer. However, many 2014 Ram owners are migrating to LED upgrades for that crisp, 6000K white light. LEDs provide instant-on brightness and a much longer lifespan. If you choose LED, look for “Fanless” designs if space is tight, or “Adjustable Beam” models that allow you to rotate the LEDs to align perfectly with the Ram’s reflector bowls, preventing you from blinding oncoming traffic.
Navigating the CAN Bus System
The 2014 Ram 1500 utilizes a CAN Bus electrical system that monitors the resistance of your bulbs. Because LEDs and HIDs draw significantly less power than stock halogens, the truck might think a bulb is “out,” leading to a “Lamp Out” dashboard error or annoying flickering. When shopping for upgrades, keep these tips in mind:
- Look for “CAN Bus Ready”: Only purchase bulbs that specifically state they are compatible with Ram or Mopar systems.
- Load Resistors: Some high-powered LEDs may require an external resistor to simulate the power draw of a halogen bulb.
- Anti-Flicker Modules: These are often necessary for HID kits to ensure the ballast receives a steady stream of power without pulsing.
Conclusion
Upgrading or replacing the headlight bulbs on your 2014 Ram 1500 is one of the most rewarding maintenance tasks you can perform. By identifying whether you have the Quad or Projector housing and gathering the right 10mm tools, you are already halfway there. Whether you stick with the reliable warmth of halogens or step up to the modern brilliance of LEDs, the improvement in visibility and safety is immediate.
Your next step is to check your current beam pattern against a garage wall to see if your bulbs are truly dimming or just misaligned. Once you have your new bulbs in hand, give yourself about 45 minutes of quiet time in the driveway to get the job done. Get those lights bright, stay safe on the road, and enjoy the view!
💬 Quick Questions & Answers
What is the low beam bulb size for 2014 Ram Quad headlights?
The Quad style headlight uses an H11 bulb for the low beam.
Do I need to remove the grille to change the bulbs?
Yes, the grille must be removed to access the inner mounting bolts of the headlight assembly.
Which bulb does the Projector style headlight use?
The 2014 Ram Projector housing typically uses a 9012 (HIR2) bulb for both high and low beams.
What tool is needed for the wheel well access flap?
You will generally need a 10mm socket or a T25 Torx bit depending on your specific trim hardware.
Why is there a hidden tab behind the headlight?
It is a sliding lock mechanism designed to stabilize the housing against the truck’s frame.
❓ Frequently Asked Questions
How do I tell if I have Quad or Projector headlights on my 2014 Ram?
Quad headlights have two distinct circular reflectors for high and low beams, while Projector headlights feature a single large glass lens ‘eye’ for the main beam and a separate vertical turn signal strip.
Why is the 9012 bulb used in Projector housings instead of a standard 9006?
The 9012 (HIR2) bulb is designed to provide significantly higher light output and a more precise beam pattern required for the optics of a projector lens.
Is it possible to change the bulbs without removing the entire headlight assembly?
No, there is insufficient clearance between the back of the housing and the engine bay components; the entire unit must be pulled forward to reach the bulb sockets.
What should I do if my new LED bulbs are flickering after installation?
2014 Ram trucks use a sensitive CANBus system; you likely need to install a load resistor or a ‘warning canceller’ to stabilize the voltage and stop the flickering.
Where exactly is the hidden release tab in the wheel well?
Inside the front wheel well, there is a small plastic access door; behind it, you must reach up and slide a white plastic tab vertically to unlock the rear of the headlight.
Can I touch the glass part of the new halogen bulb?
No, you should never touch the glass with bare skin because the oils from your fingers will cause the bulb to overheat and burn out almost immediately.


![2015 Ram Headlight Bulb Size Guide: Specs & Fitment Guide [2026]](https://truckguider.com/wp-content/uploads/2026/03/2015-ram-headlight-bulb-featured.webp)
![RAM 1500 Tail Light Bulb Guide: Sizes & LED Upgrades [2026]](https://truckguider.com/wp-content/uploads/2026/03/ram-1500-tail-light-bulb-featured-768x403.webp)