2015 RAM 1500 AC Recharge Port Location & Identification [2026]
The low-pressure AC recharge port on a 2015 RAM 1500 is located on the passenger side engine bay, specifically near the firewall behind the air intake box. It is identifiable by a black or blue plastic cap marked with the letter ‘L’ and is the only safe port for adding refrigerant.
🎯 Key Takeaways
- Find the low-side port on the passenger side near the firewall.
- Identify the correct port by the cap marked with ‘L’.
- Verify your refrigerant type (usually R-134a) via the under-hood label.
- The high-side port is located on the driver side and must be avoided.
- Ensure the air intake housing doesn’t obstruct your access to the coupler.
On your 2015 RAM 1500, the low-pressure AC recharge port is located on the passenger side of the engine compartment, positioned between the air intake box and the firewall. You will find it on the thicker aluminum line that runs toward the cabin of the truck. This is the only port you should use when adding refrigerant from a retail recharge kit, as the fittings are specifically sized to prevent accidental connection to the high-pressure side.

Locating this port correctly is the most critical step in restoring your truck’s cooling performance. Identifying it correctly ensures you do not damage your compressor or cause a safety hazard by over-pressurizing the DIY canister. Since the 2015 model year can feature slightly different hose routings depending on your specific engine—whether you have the 3.6L Pentastar V6 or the 5.7L Hemi V8—knowing the specific landmarks near the passenger-side fender will save you from searching the entire engine bay in the heat.
Identifying Low-Pressure vs. High-Pressure Service Ports
Automotive air conditioning systems use two different service ports: the low-pressure (suction) side and the high-pressure (discharge) side. For a 2015 RAM 1500, you must distinguish between these two to avoid catastrophic tool failure or personal injury. The low-pressure port is where the system “sucks” in the refrigerant, which is why DIY kits are designed to fit only this specific valve.

The “L” Cap and Port Diameter
The easiest way to identify the correct port is by looking at the plastic dust cap. Most 2015 RAM models feature a black or blue plastic cap molded with the letter L for Low. Beyond the lettering, the physical size of the port is a dead giveaway. The low-side port has a smaller diameter than the high-side port. If you try to snap a standard recharge hose onto the high-side port, it simply will not fit. This is a deliberate safety feature designed into the R-134a system standards.
- Low-Side Port: Smaller diameter, usually has an “L” cap, located on the thicker aluminum tubing.
- High-Side Port: Larger diameter, usually has an “H” cap, located on the thinner aluminum tubing closer to the front of the vehicle.
- Line Temperature: While the engine is running and the AC is on, the low-side line will feel cold to the touch, whereas the high-side line will be very hot.
Verifying Refrigerant via the VECI Label
Before you even touch the port, you must verify the type of refrigerant your 2015 RAM 1500 requires. While most 2015 RAMs use R-134a, some late-model production units or specific regional builds might have transitioned toward R-1234yf. You can find this information on the Vehicle Emission Control Information (VECI) label, which is typically a bright sticker located on the underside of the hood or on the radiator support beam.
Using the wrong refrigerant will contaminate the system and potentially seize the compressor. Ensure your recharge canister matches the refrigerant type listed on the label. The ports for R-134a and R-1234yf are different, so a standard R-134a hose will not click onto an R-1234yf port, providing an extra layer of protection against mixing chemicals.
The Ultimate 2015 Ram 1500 AC Recharge Walkthrough
When the summer heat hits, there is nothing more frustrating than your 2015 Ram 1500 blowing lukewarm air from the vents. Over time, your truck’s air conditioning system can lose refrigerant through microscopic leaks in seals or hoses. Performing a DIY recharge is a practical way to restore that icy-cold airflow without the hefty price tag of a dealership visit. This guide covers everything from locating the specific low-pressure port to safely handling R-134a refrigerant, ensuring your Hemi or Pentastar-equipped Ram stays comfortable all season long. Following these steps carefully is vital to avoid over-pressurizing the system, which could lead to expensive compressor failure.
Step 1: Gather Necessary Tools and Safety Equipment
What you need: Safety glasses, nitrile gloves, an R-134a AC recharge kit (refrigerant can with a built-in gauge and trigger), and a digital thermometer.
Instructions: Before you even open the hood of your Ram, you must prioritize safety. Air conditioning systems operate under high pressure, and refrigerant can cause instant frostbite if it contacts your skin or eyes. Put on your safety glasses and gloves. Ensure you have the correct refrigerant; the 2015 Ram 1500 typically uses R-134a (check the yellow or green specification sticker under the hood to verify). If your recharge kit does not come with a gauge, you should purchase one separately. A thermometer is essential for verifying the temperature drop inside the cabin as you work.
Pro Tip: Look for a recharge kit that includes “leak sealer” only if you suspect a very minor leak; however, be aware that many professional mechanics dislike these sealers as they can occasionally gum up expensive recovery machines later on.
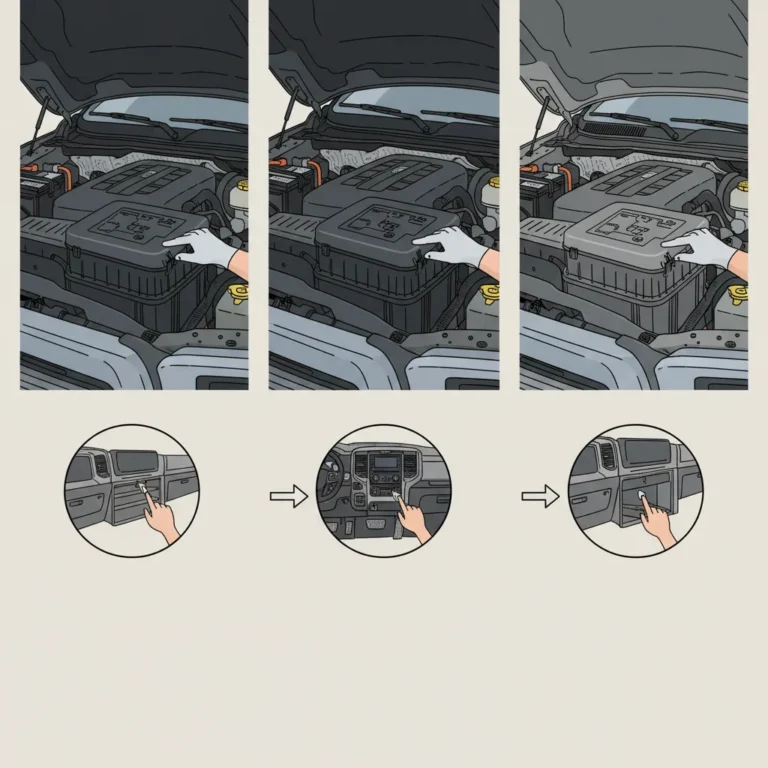
Step 2: Locate the Low-Pressure Service Port
What you need: Your vehicle’s engine bay and a flashlight (optional).
Instructions: Open the hood of your 2015 Ram 1500 and secure it with the prop rod or ensure the struts are holding. You are looking for the low-pressure service port. On most 2015 Ram models (especially the 5.7L V8), this port is located on the passenger side of the engine bay, near the firewall. It is situated on the thicker aluminum line (the suction line) that leads from the AC compressor back to the evaporator. Look for a small plastic cap, often black or blue, labeled with an ‘L’. Do not confuse this with the high-pressure port, which is located on a thinner line and features a larger diameter fitting that your recharge hose will not physically fit onto.
Pro Tip: Wipe the area around the cap with a clean rag before removing it. This prevents dirt or grit from falling into the valve, which could cause a slow leak after you finish the job.
Step 3: Prepare the Vehicle for Recharge
What you need: Your ignition key and access to the dashboard controls.
Instructions: Start your Ram 1500 and let it idle. Set the parking brake for safety. Turn the air conditioning system to the “MAX AC” setting, turn the fan speed to its highest position, and ensure the “Recirculation” mode is active. This forces the AC compressor to engage and run continuously, which is necessary to get an accurate pressure reading. If the compressor clutch (the front part of the AC pulley) is not spinning, your system might be too low on refrigerant to trigger the pressure switch, or there may be a mechanical failure. Let the truck run for about 3 to 5 minutes to stabilize the system pressures before proceeding.
Pro Tip: If your compressor is “short-cycling” (turning on and off every few seconds), it is a classic sign of low refrigerant. The recharge process will eventually stabilize this cycling.
Step 4: Connect the Recharge Hose to the Port
What you need: The R-134a can and the quick-connect hose assembly.
Instructions: Remove the plastic cap from the low-pressure port identified in Step 2. Shake the refrigerant can for about 30 seconds to mix the contents. Take the quick-connect coupler at the end of the recharge hose, pull back the outer sleeve, and press it firmly onto the low-pressure port. You should hear a distinct click. Tug on it slightly to ensure it is locked in place. Do not pull the trigger yet. Look at the gauge on the can. With the compressor running, the gauge will give you a “live” reading of the current system pressure. If the gauge reads in the “warning” or “red” zone immediately, stop; you may have a mechanical blockage rather than a low refrigerant issue.
Pro Tip: Always connect the hose to the port before puncturing the seal on the can (if using a screw-on tap) to prevent accidental discharge of refrigerant into the atmosphere.
Step 5: Determine the Target Pressure
What you need: An ambient temperature reading (the temperature of the air outside the truck).
Instructions: The “correct” pressure for an AC system is not a fixed number; it fluctuates based on the outside temperature. Check the chart usually provided on the back of the recharge kit or the gauge face. For example, if it is 85°F outside, your target low-side pressure should typically be between 45 and 55 PSI. If it is only 70°F, your target might be closer to 35-40 PSI. Recharging based on a 90-degree day versus a 70-degree day requires different final readings. Misreading this chart is the number one cause of overfilling, which can actually make the air warmer because the refrigerant cannot properly expand into a gas.
Pro Tip: Use the temperature display on your Ram’s Uconnect screen to get a highly accurate ambient temperature reading for your specific location.
Step 6: Add Refrigerant to the System
What you need: The recharge kit and a steady hand.
Instructions: Squeeze the trigger on the can to begin the flow of refrigerant. While charging, you must slowly rotate the can back and forth from a 12 o’clock position to a 3 o’clock position. This helps the liquid refrigerant inside the can flash into a gas as it enters the system, preventing “slugging” the compressor with liquid. Release the trigger every 10 to 15 seconds to check the gauge reading. You will notice the needle drop when the trigger is pulled and rise when released; only the “trigger released” reading is accurate. Continue this process until the needle consistently sits within the recommended PSI range for the current outside temperature.
Pro Tip: Never turn the can upside down (6 o’clock position) while charging. This sends pure liquid refrigerant into the compressor, which can cause internal damage.
Step 7: Verify Temperature Drop and Finish
What you need: Digital thermometer and the plastic port cap.
Instructions: Once the gauge reaches the target zone, go inside the cab and insert your digital thermometer into the center AC vent. For a 2015 Ram 1500, you are looking for a vent temperature between 40°F and 48°F, depending on the outside heat. If the air is significantly colder than when you started and the gauge is in the green, you are successful. Walk back to the engine bay, pull the sleeve on the quick-connect coupler to release it from the port. You may hear a small “pssh” sound of escaping gas; this is normal. Replace the plastic dust cap on the low-pressure port tightly to ensure no debris enters the valve.
Pro Tip: If you have added a full can and the air is still not cold, do not simply add a second can. You likely have a significant leak or a failed expansion valve that needs professional diagnosis.
✅ Final Checklist
- Confirm the low-pressure port cap is reinstalled and tightened securely.
- Verify that the AC compressor clutch is staying engaged and not rapidly cycling on and off.
- Check that the center vent temperature has dropped to at least 20 degrees below the ambient outside temperature.
- Ensure the recharge hose is disconnected and no refrigerant is leaking from the service valve.
- Double-check that no tools or rags were left in the engine bay near moving belts or fans.
Important Notes:
- Safety Warning: Avoid overfilling the system. More refrigerant does NOT mean more cooling; an overfilled system will trigger a high-pressure cutoff and stop cooling entirely.
- When to Seek Professional Help: If the gauge shows 0 PSI before you start, your system has a total leak and air has entered the lines. You must have a professional vacuum the system and repair the leak before recharging.
- Estimated Time: 20–30 minutes.
- Cost Range: $30 – $60 for a DIY kit, compared to $150 – $300 at a repair shop.
Engine Bay Layout and Component Landmarks
Finding the port on a 2015 RAM 1500 requires looking past the large plastic covers and components that dominate the engine bay. The AC lines are tucked away, but they follow a predictable path from the compressor to the firewall. In this truck, the passenger side is your primary area of focus.
Using the Air Intake Box as a Guide
Open your hood and look to the far left (the passenger side). You will see the large black plastic housing for the engine air filter. The AC low-side port is located directly behind or slightly to the side of this air box. On many 5.7L Hemi models, the port is easily accessible right in the gap between the air box and the inner fender well. It sits atop an aluminum pipe that emerges from the depths of the engine bay and heads toward the rear of the vehicle.
- Landmark 1: Passenger side fender.
- Landmark 2: Large black air intake box.
- Landmark 3: The silver aluminum line running parallel to the fender.
Locating the Firewall Connection
If you are having trouble spotting the port, trace the AC lines from the firewall. The firewall is the metal partition between the engine and the cabin. You will see two aluminum pipes protruding from the firewall on the passenger side. Follow the thicker of these two pipes. As it moves forward toward the front of the truck, you will encounter the service port sticking straight up or slightly angled toward the engine. It is generally positioned high enough that you do not need to remove any components to reach it, though you may need to move some flexible wiring harnesses aside to get a clear grip on the cap.
Ensure the area around the port is clean before removing the cap. Small bits of road grime or sand falling into the Schroeder valve can cause a slow leak after you finish the recharge process. Simply wipe the port with a clean rag before unscrewing the “L” cap to maintain a proper seal.
Refrigerant Specifications and VECI Label Verification
Identifying the physical location of the low-side port is a great start, but you cannot proceed without verifying the exact type of refrigerant your specific 2015 RAM 1500 requires. While most trucks from this model year utilize R-134a, the mid-2010s was a transition period for the automotive industry moving toward R-1234yf. Using the wrong refrigerant or oil can cause catastrophic compressor failure, making verification your most important preliminary step.
Reading the VECI Label
The Vehicle Emission Control Information (VECI) label is your primary source of truth. This sticker is typically located on the underside of the hood or prominently displayed on the radiator support crossmember. This label provides the factory-certified specifications for your AC system. When inspecting the label, look for the following key details:
- Refrigerant Type: It will clearly state “R-134a” or, less commonly for this specific year, “R-1234yf.”
- Charge Capacity: This tells you the total weight of refrigerant the system holds (usually measured in pounds or kilograms).
- Oil Type: Most 2015 RAM systems require a specific viscosity of PAG oil, which is also noted here.
Why Specification Accuracy Matters
For example, if your RAM 1500 has been modified or has a heavy-duty cooling package, the charge capacity might differ slightly from a base model. Additionally, the couplers for R-134a and R-1234yf are physically different to prevent cross-contamination. If your gauge set doesn’t seem to fit the passenger-side port perfectly, double-check that VECI label; you might be trying to use an R-134a quick-connect on a system designed for the newer refrigerant type.
Common Obstacles When Accessing the Passenger-Side Port
The 2015 RAM 1500 engine bay is spacious, but the engineers tucked the AC lines back toward the firewall, which can present a few physical challenges. Reaching the low-side port isn’t always as simple as reaching in and grabbing it. You are working in a high-heat environment with limited visibility near the back of the engine block.
Clearance and Heat Management
The most common obstacle is the proximity of the AC lines to the engine’s heat-generating components. Because the port is located near the rear of the engine bay on the passenger side, the surrounding metal can remain incredibly hot even after the truck has been turned off for a while. Practical tips for navigating this space include:
- Flashlight Requirement: The port is often shrouded in shadows. A bright LED work light is essential to ensure you are seated squarely on the valve.
- Cramped Hand Space: If you have larger hands, the gap between the fender well and the engine can feel tight. Avoid forcing the coupler, as the aluminum AC lines can bend or crack under excessive pressure.
- Cap Obstruction: Sometimes the plastic dust cap is screwed on so tightly that it requires a pair of pliers to loosen, especially if road grime has built up in the threads over the last several years.
Identifying Recessed or Damaged Ports
Another issue owners face is a port that has become slightly recessed or “tucked” behind other hoses or wiring harnesses. Over time, clips that hold these lines in place can break, allowing the AC line to shift. If the port looks like it is angled away from you, do not pull on it aggressively. Ensure there are no kinks in the line and that the Schrader valve inside the port is clean and free of green dye or oily residue, which would indicate a pre-existing leak at the port itself.
Conclusion
Locating and identifying the AC recharge port on your 2015 RAM 1500 is a straightforward task once you know to look toward the passenger-side firewall for the larger-diameter low-side line. By verifying your refrigerant type via the VECI label and being mindful of the tight, high-heat environment near the back of the engine, you can confidently assess your truck’s climate control system. Your next steps are to confirm your system’s pressure with a reliable gauge and ensure you have the correct R-134a equipment on hand. Stay cool out there and keep your RAM performing at its best!
💬 Quick Questions & Answers
Where is the 2015 RAM 1500 low-side AC port?
It is located on the passenger side of the engine compartment, tucked back near the firewall.
How do I tell the low-side port from the high-side port?
The low-side port has a smaller diameter and a cap labeled ‘L’, while the high-side is larger and labeled ‘H’.
What refrigerant does a 2015 RAM 1500 use?
Most models use R-134a, but you should check the yellow VECI sticker under the hood to confirm.
Do I need to remove the air box to reach the port?
No, but it is a tight fit, and moving the flexible intake ducting slightly may provide better hand clearance.
Why won’t my recharge hose fit the port?
Ensure you are using a standard R-134a quick-connect coupler and that you aren’t accidentally trying to connect to the larger high-side port.
❓ Frequently Asked Questions
Why is the AC recharge port located so far back in the engine bay?
The 2015 RAM 1500 engine bay is densely packed; the AC lines run along the passenger side frame rail to the evaporator inside the dash, placing the service port near the firewall for system efficiency.
What should I look for on the under-hood VECI label?
The Vehicle Emission Control Information (VECI) label lists the specific refrigerant type (R-134a or R-1234yf) and the total system capacity in ounces or kilograms.
Can I use the high-pressure port to add refrigerant?
No, attempting to add refrigerant through the high-side port is extremely dangerous as the high pressure can cause the refrigerant can to explode.
How can I tell if the port is leaking after I remove the cap?
Apply a small amount of soapy water to the valve; if bubbles form, the Schrader valve inside the port is leaking and needs to be tightened or replaced.
Is the port location the same for both the 3.6L V6 and 5.7L Hemi engines?
Yes, the general AC plumbing remains consistent across most 2015 RAM 1500 engine options, with the low-side port staying on the passenger side.
Why does the low-side port have a specific ‘quick-connect’ design?
The quick-connect design is a safety feature that ensures only the correct charging equipment can be attached to the low-pressure side of the system.