Dodge Ram 1500 Fuse Box Diagram: Reference Guide
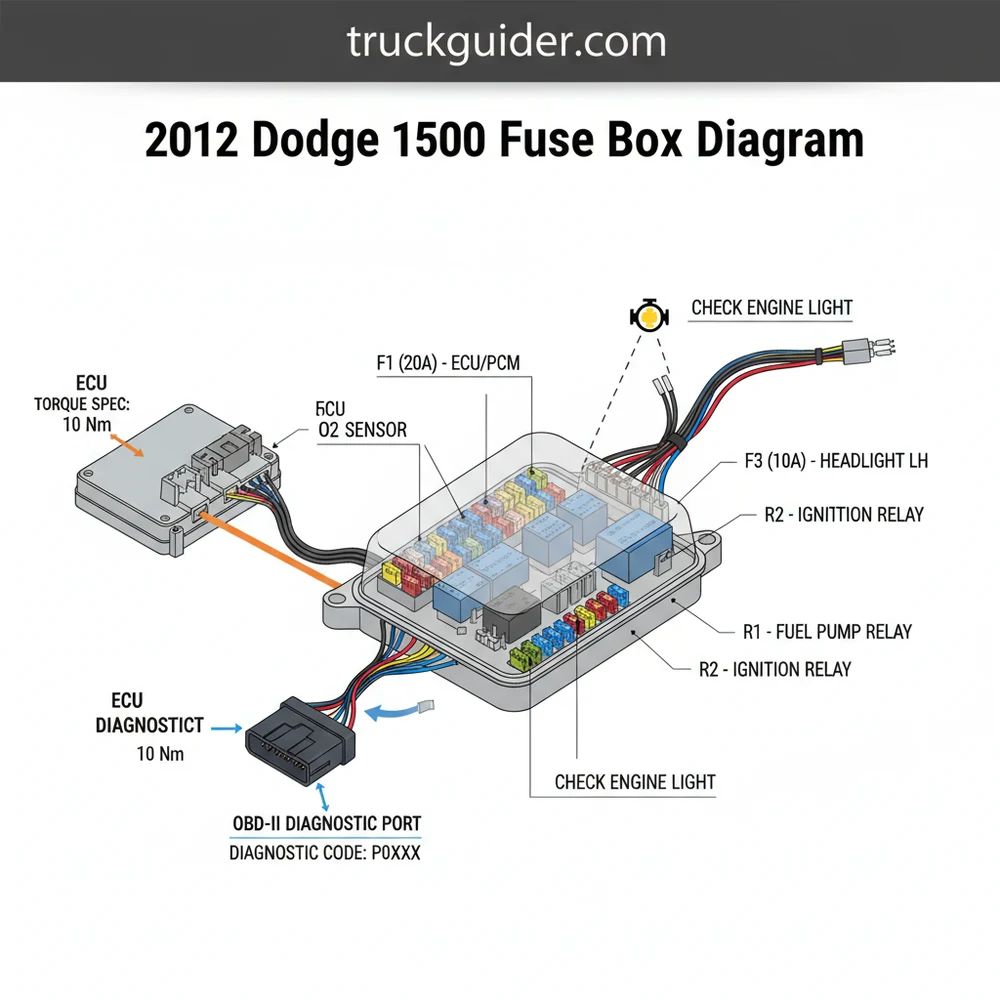
The 2012 Dodge Ram 1500 fuse box diagram identifies the Totally Integrated Power Module (TIPM) located in the engine compartment next to the battery. This central hub manages power for the ECU, lighting, and accessories. Accessing this diagram is essential for troubleshooting electrical failures or resolving a diagnostic code.
📌 Key Takeaways
- Provides the layout for the Totally Integrated Power Module (TIPM)
- Crucial for identifying the ECU and fuel pump fuses
- Always disconnect the battery before replacing high-amperage fuses
- Use a multimeter to test fuses without removing them
- Necessary when a check engine light indicates electrical circuit faults
When you find yourself stranded on the side of the road or facing a mysterious electrical glitch in your truck, the 2012 dodge ram 1500 fuse box diagram becomes your most valuable resource. Whether your radio has gone silent, your headlights refuse to flicker to life, or the dreaded check engine light has illuminated your dashboard, the journey to a solution begins within the engine bay’s power distribution center. Understanding this diagram is not just about finding a small piece of plastic; it is about mastering the electrical nervous system of your vehicle. This guide provides a comprehensive breakdown of the fuse box layout, the functions of specific circuits, and the diagnostic steps required to keep your Ram 1500 running reliably.
In the 2012 Dodge Ram 1500, the fuse box is officially known as the Totally Integrated Power Module (TIPM). Unlike older vehicles that had multiple fuse panels scattered throughout the cabin, this model centralizes almost all critical fuses and relays into a single unit located under the hood, directly next to the battery.
The 2012 dodge ram 1500 fuse box diagram reveals a sophisticated grid of protected circuits designed to safeguard the vehicle’s sensitive electronics. The TIPM acts as the primary gatekeeper for electricity flowing from the battery to components like the ECU (Engine Control Unit), fuel pump, and lighting systems. The diagram itself is usually embossed on the underside of the plastic fuse box cover, though these can become faded or difficult to read over time. The layout is organized into rows of “M” fuses (Mini-fuses) and “J” fuses (J-Case fuses), along with several larger relays.
Visually, the diagram separates the box into distinct zones. The Mini-fuses, typically labeled M1 through M38, handle lower-amperage components such as the cabin lights, airbags, and the OBD-II diagnostic port. The J-Case fuses, labeled J1 through J22, are larger, square-shaped fuses that manage high-current draws for systems like the starter motor, cooling fan, and power seats. Color coding is essential here: for Mini-fuses, red is 10A, light blue is 15A, yellow is 20A, and clear is 25A. For J-Case fuses, blue is 20A, pink is 30A, and green is 40A. Understanding this color scheme allows you to identify the correct replacement at a glance without needing to squint at the small numbers printed on the fuse body.
Note: The physical TIPM is located on the driver’s side of the engine compartment. When looking at the diagram, the fuses are oriented with the battery leads typically facing toward the fender.
To effectively use the 2012 dodge ram 1500 fuse box diagram, you must follow a systematic approach to identification and testing. Electrical systems are sensitive, and a mistake can lead to a fried ECU or a triggered diagnostic code that requires an expensive scanner to reset.
- ✓ Step 1: Preparation and Safety – Ensure the ignition is completely off and the keys are removed. It is highly recommended to wear safety glasses. While not always necessary for a single fuse, disconnecting the negative battery terminal is the safest way to prevent accidental short circuits during deep electrical work.
- ✓ Step 2: Accessing the TIPM – Locate the black plastic box next to the battery. Squeeze the two retention tabs on the side of the box and lift the lid upward. Flip the lid over to view the internal 2012 dodge ram 1500 fuse box diagram.
- ✓ Step 3: Circuit Identification – Cross-reference your symptom with the diagram. For example, if your OBD-II scanner won’t connect, look for fuse M13 (15 Amp) or M15 (20 Amp), which often power the diagnostic link and interior modules.
- ✓ Step 4: Visual Inspection – Use the white plastic fuse puller tool located inside the fuse box. Gently pull the suspected fuse straight up. Hold it up to a light source. If the metal bridge inside the translucent plastic is broken or if there are dark burn marks, the fuse is blown.
- ✓ Step 5: Multimeter Testing – For a more accurate reading, set a digital multimeter to the Continuity or Ohms setting. Touch the probes to the two small metal test points on the top of the fuse while it is still installed. A “beep” or a reading close to zero ohms indicates the fuse is good.
- ✓ Step 6: Replacement – Always replace a blown fuse with one of the exact same amperage. Never “up-size” a fuse (e.g., replacing a 10A with a 20A), as this can cause the wiring to overheat, potentially leading to an engine bay fire.
- ✓ Step 7: System Verification – Reinstall the fuse, close the TIPM lid securely, and reconnect the battery. Start the vehicle and check if the component is working or if the check engine light has cleared.
If you are experiencing intermittent power loss to the entire truck, check the main J13 fuse (60 Amp). This fuse feeds the main ignition switch and is a common failure point that can mimic a dead battery or a broken timing chain.
When troubleshooting the 2012 Dodge Ram 1500, certain fuses are more prone to failure than others. One of the most notorious issues involves the fuel pump relay, which is actually soldered internally to the TIPM circuit board. While the 2012 dodge ram 1500 fuse box diagram shows Fuse M25 (20 Amp) as the fuel pump circuit, a blown fuse here is often a symptom of a failing internal relay. If your truck cranks but won’t start, or stalls unexpectedly, checking M25 is the first step.
Another common issue involves the trailer tow circuits. If your trailer lights aren’t working but the truck’s lights are fine, consult the diagram for fuses J08 and J21. These circuits are separate from the main vehicle lighting to ensure that a short in a trailer doesn’t leave the driver in the dark. Furthermore, if you encounter a diagnostic code related to the transmission or engine performance, always verify the integrity of the ECU power supply fuses (usually M33 and M37). A simple blown fuse can trigger a “Limp Mode” condition that feels like a major mechanical failure.
If a fuse blows immediately after being replaced, do not attempt to replace it a second time. This indicates a “hard short” in the wiring. Continuing to provide power to a shorted circuit can damage the ECU or melt the wiring harness, leading to thousands of dollars in repairs.
Beyond the fuses, maintenance of the electrical environment is key. While you have the hood open to inspect the TIPM, it is a great habit to perform a general engine bay health check. Inspect the accessory belt for cracks or fraying; a snapped belt will immediately stop the alternator from charging the battery, leading to a total electrical shutdown that no fuse can fix. Similarly, check for proper coolant flow in the reservoir. Overheating can sometimes cause electrical components like the cooling fan relay (J19) to fail due to excessive heat soak.
When it comes to high-load components, understanding torque specs is vital for any related mechanical repairs. For instance, if you have to remove the TIPM bracket to access other components, ensure the mounting bolts are tightened to the manufacturer’s torque spec to prevent vibration-induced wear on the electrical connectors. Corrosion is another enemy; the underside of the TIPM is known for gathering moisture. If you see green “crust” on the bottom connectors, use a dedicated electrical contact cleaner to prevent parasitic draws and ghost diagnostic codes.
The 2012 Ram uses a “Smart” charging system. If the ECU detects an issue with the battery temperature or internal resistance, it may alter the voltage output. This can sometimes be mistaken for a blown fuse or a failing alternator. Always use an OBD-II scanner to check for “Battery Voltage” data pids if you suspect an electrical issue.
In conclusion, having a firm grasp of the 2012 dodge ram 1500 fuse box diagram is an essential skill for any owner. It bridges the gap between being a frustrated driver and an empowered DIY mechanic. By understanding which fuse controls the ECU, how to locate the fuel pump circuit, and the proper way to test for continuity, you can solve many common issues without a trip to the dealership. Remember to always work from the simplest solution—the fuse—upward to more complex components like the accessory belt or internal engine timing. With the right diagram and a bit of patience, you can ensure your Ram 1500 stays on the road and performs exactly as it should. Keeping a spare set of Mini and J-Case fuses in your glovebox, along with a copy of the diagram, is a small investment that pays massive dividends when you’re far from home and the lights go out.
Step-by-Step Guide to Understanding the Dodge Ram 1500 Fuse Box Diagram: Reference Guide
Identify the fuse box location in the engine bay near the battery.
Locate the plastic tabs on the TIPM cover and press them to open the unit.
Understand the diagram on the underside of the lid to find the relevant circuit.
Connect a multimeter to the fuse or use a puller to extract it for inspection.
Verify the new fuse matches the exact amperage listed in the diagram.
Complete the repair by closing the lid securely and clearing any stored codes via OBD-II.
Frequently Asked Questions
Where is the fuse box located?
The primary fuse box, known as the TIPM, is located under the hood on the driver’s side, right next to the battery. It is protected by a black plastic cover. A secondary interior fuse panel is not present on this model; almost all circuits are managed by the engine bay module.
What does the fuse box diagram show?
The 2012 Dodge Ram 1500 fuse box diagram shows the numerical layout and amperage ratings for every fuse and relay. It identifies which fuse controls the ECU, injectors, trailer lights, and cabin electronics, allowing you to trace power loss to a specific blown component or faulty relay.
How many connections does the TIPM have?
The TIPM has dozens of internal fuse slots and several large multi-pin wiring harnesses connected to its base. These harnesses link the power distribution to the OBD-II port and various sensors. When reinstalling the module, ensure the mounting bolts meet the manufacturer’s torque spec to prevent vibrations from loosening connections.
What are the symptoms of a bad fuse?
Common symptoms include a persistent check engine light, accessories failing to turn on, or the truck failing to start. If you pull a diagnostic code related to a ‘Circuit Low’ or ‘Communication Loss,’ the diagram can help you find the corresponding fuse to see if it has melted or broken.
Can I replace these fuses myself?
Yes, most owners can easily replace fuses using the 2012 Dodge Ram 1500 fuse box diagram as a guide. It is a straightforward DIY task that involves pulling the old fuse and inserting a new one of the same rating. However, if a fuse blows repeatedly, professional diagnosis is recommended.
What tools do I need for fuse testing?
You will need a fuse puller (often found inside the TIPM lid) and a digital multimeter for testing continuity. If you are diagnosing a complex electrical issue, an OBD-II scanner is also necessary to read the specific diagnostic code triggered by the fault before you begin replacing components.

![2018 Ram 1500 Transmission: Specs & Fitment Guide [2026]](https://truckguider.com/wp-content/uploads/2026/03/2018-ram-1500-transmission-featured.webp)

![2001 Dodge Ram 1500 Battery Specifications, Selection [2026]](https://truckguider.com/wp-content/uploads/2026/03/featured-f120b470-768x768.webp)