Engine Block Heater Installation [2026]
When temperatures plummet below zero, the molecular structure of engine oil shifts, creating a viscous sludge that makes a cold start feel like a mechanical assault on your vehicle. Cold starts account for the majority of engine wear, as traditional lubricants fail to reach critical components in time, while freezing blocks put immense strain on batteries and starters. For professionals operating in sub-arctic or high-latitude environments, a standard ignition sequence is often not enough to ensure vehicle longevity. This comprehensive guide provides a professional-grade blueprint for engine block heater installation, ensuring your vehicle remains reliable, efficient, and protected throughout the harshest winters.
Identifying the Optimal Engine Block Heater Type for Professional Thermal Management
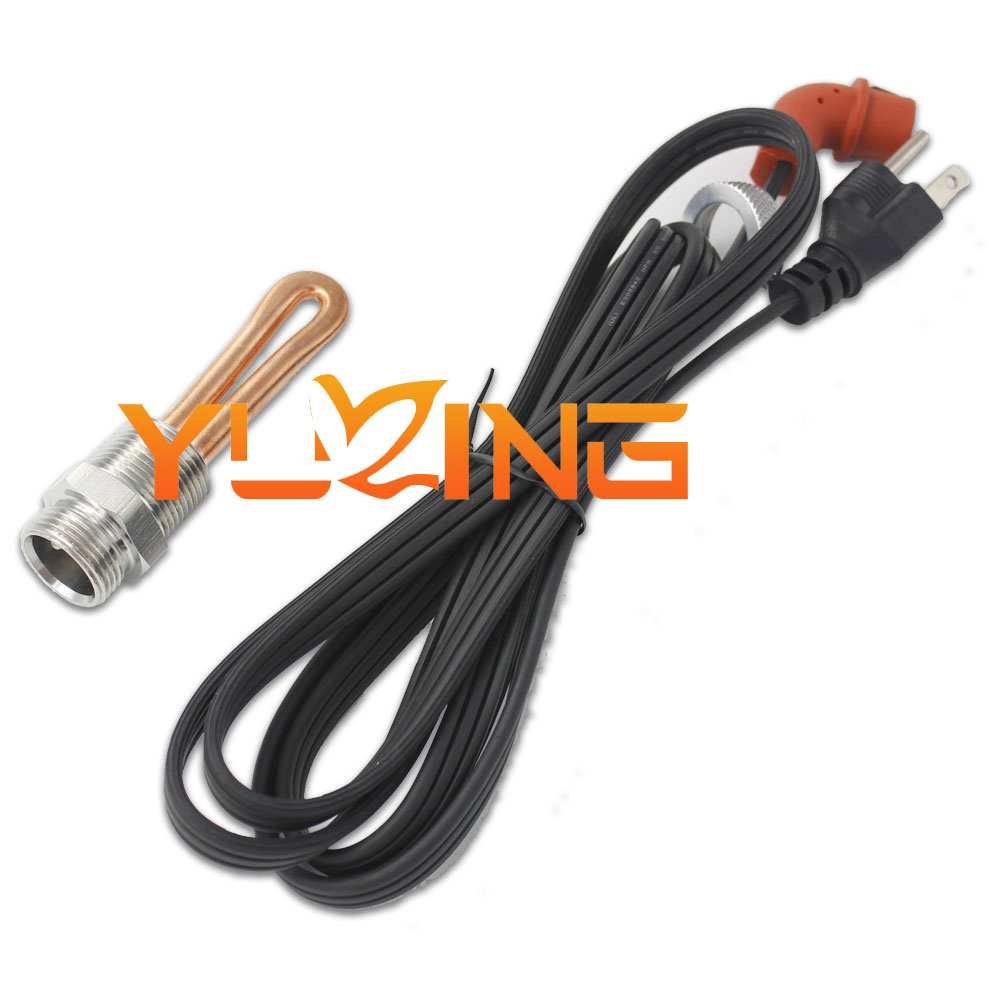
Selecting the right heating element requires a nuanced understanding of engine architecture and thermal dynamics. The most trusted method for consistent heat distribution is the coolant immersion heater. These units replace a standard freeze plug (core plug) and sit directly in the coolant gallery. By heating the liquid medium, they utilize natural thermal siphoning—where hot coolant rises and cold coolant sinks—to permeate the entire block with warmth. This is inherently more efficient than external “bolt-on” heating elements, which rely on conductive heat transfer through the block’s exterior casing.
Metallurgical Compatibility and Corrosion Prevention
An expert technician must account for the block’s material composition. Modern engines frequently utilize aluminum alloys, while heavy-duty and older blocks consist of cast iron. Installing a brass-housed heater into an aluminum block without a proper isolation gasket or specified O-ring can trigger galvanic corrosion. This electrochemical reaction can compromise the integrity of the freeze plug port, leading to catastrophic coolant loss. Professional installations always verify that the heating element housing is compatible with the block metallurgy or utilizes a high-grade synthetic O-ring for physical separation.
Wattage requirements are determined by displacement and the minimum expected ambient temperature. For a compact sedan with a 2.0L engine, a 400W cartridge heater is sufficient to maintain operational readiness. However, a heavy-duty 6.7L diesel engine requires at least a 1000W immersion heater to overcome its massive thermal mass. Research indicates that pre-heating an engine to 20°C can reduce cold-start fuel consumption by up to 10% in sub-zero conditions, making the initial investment in a high-quality unit highly cost-effective over time.

Essential Tooling and Preparatory Protocols for a Trusted Installation
A complete installation kit extends beyond the heater itself. To perform an expert-level installation, you must secure shop-grade tooling that ensures precision and safety. Unlike basic maintenance, freeze plug removal requires high-impact force in restricted spaces, making specialized brass drifts and heavy-duty pry bars non-negotiable.
Specialized Toolkit
Requires brass drifts, a 1/2-inch drive torque wrench, and deep-well sockets designed for element clearance.
Chemical Sealants
Permatex High-Temp RTV or silicone-based O-ring lubricants are essential for ensuring a leak-free thermal cycle.
Environmental Compliance and Fluid Management
Because immersion heaters require the removal of a core plug, the cooling system must be partially drained. Standard cooling systems can contain between 8 to 15 liters of fluid; professional recovery prevents hazardous runoff into local water systems. Use a clean recovery basin if you intend to reuse the coolant, or prepare to dispose of the old ethylene glycol in accordance with local environmental regulations. Before installation, the core hole must be scoured with a fine Scotch-Brite pad to remove any oxidation or casting flash. A perfectly smooth mating surface is the only way to guarantee the reliable performance of the heater over multiple winter seasons.
Never rely on a hydraulic jack alone. When working beneath the vehicle to access block ports, always secure the chassis with professional-grade jack stands rated for 1.5x the vehicle’s curb weight. Failure to do so can result in fatal injury during high-torque applications.
Step-by-Step Technical Execution of the Engine Block Heater Installation
The technical execution of the install is where expert knowledge separates a temporary fix from a permanent upgrade. In modern transverse-mounted engines, the biggest challenge is spatial navigation. You will often be working around motor mounts, catalytic converters, or steering racks to reach the optimal core plug port.
📋
Step-by-Step Technical Guide
Locate the specified freeze plug designated in the manufacturer’s technical manual. This is usually on the rear side of the block for RWD vehicles or the side facing the radiator for FWD applications. Ensure the selected port allows the element to be fully submerged without touching internal cylinder walls.
Use a brass drift and hammer to strike the edge of the freeze plug. This forces the plug to pivot 90 degrees inside the port. Once rotated, grab the edge with heavy-duty pliers and pull it out. Caution: Do not knock the plug entirely into the coolant gallery, as retrieving it may require engine disassembly.
Coat the heater O-ring with lubricant and insert the element. Misalignment of the element by as little as 15 degrees in certain blocks can lead to premature element burnout due to poor coolant contact. Ensure the heating loops are pointed away from the block walls to allow for maximum convection.
Tighten the retaining nut or mounting bolts to the exact foot-pound specifications found in the heater’s manual. Over-tightening can deform the O-ring, while under-tightening will lead to leaks as the block expands and contracts during heating cycles.
Electrical Routing and Cable Management for Long-Term System Integrity
The physical heater installation is only half the battle; the electrical routing determines the system’s overall safety. In cold weather, standard plastics become brittle. Automotive electrical cords must be rated for -40°C to remain flexible and prevent insulation cracking in extreme winter environments. A cracked cord is not just a failure point; it is a fire hazard that can lead to a short circuit across the chassis.
Advanced Cable Pathing
Avoid the common mistake of simply “tucking” the cord into the engine bay. An expert installation utilizes heat-resistant zip ties to anchor the cord along the frame rail, keeping it at least 6 inches away from exhaust manifolds or turbocharger housings. Furthermore, the cord must be clear of the serpentine belt and cooling fan path. If the engine shifts during acceleration (engine roll), the cord must have enough slack to move with the block without pulling on the heater terminals.
Instead of routing the plug through the wheel well where it’s exposed to road salt and slush, route it through the front grille. Install a weather-resistant flip-cover plug. This keeps the prongs clean and dry, preventing the high-resistance corrosion that often burns out extension cord ends.
Before concluding the electrical phase, use a multimeter to test for continuity between the plug prongs and ground. There should be zero continuity between the hot/neutral prongs and the engine block. Any reading here indicates a manufacturing defect or a pinched wire, which could electrify the entire vehicle frame—a critical safety risk for anyone touching the car while it’s plugged in.
System Verification and Post-Installation Maintenance Schedules
Once the heater is secured and the wiring is routed, the system requires a rigorous verification process. The most common cause of immediate heater failure is air trapped in the cooling system. Air pockets in the cooling system can cause localized temperatures to exceed 300°C near the element, causing immediate failure of the heater as it “dry-burns” without a medium to absorb the heat.
✅ Verification Checklist
- Vacuum-fill cooling system if possible
- Idle engine until thermostat opens
- Verify heater resistance (Ohms)
- Inspect for weepage at the port
- Test GFI outlet compatibility
❌ Common Failure Points
- Trapped air bubbles (Air-lock)
- Corroded extension cord ends
- Heat-damaged cable insulation
- Loose element retaining screws
- Over-dependence on old RTV
Establishing a Maintenance Lifecycle
Maintenance for a block heater is seasonal. To maintain a trusted and reliable system, follow this 12-month calendar:
- 📅 October: Perform a “Cold Continuity Test.” Check the cord for cracks and apply dielectric grease to the plug prongs.
- 📅 November – March: Use a smart timer. Running a heater for 3 hours before starting is optimal; running it all night is a waste of energy and can shorten the element’s lifespan.
- 📅 April: Inspect the port for any signs of slow coolant leaks (white or pink crusty deposits) and secure the plug for the summer months.
By The Numbers
Fuel Savings on Cold Starts
Max Element Temp (Air Pocket)
Cord Rating Requirement
Final Technical Summary
Selecting the correct heater type is the foundation of a reliable thermal management system. Technical precision during installation—particularly during the pivot-and-pull removal of the core plug and the subsequent element alignment—prevents leaks and ensures consistent heat distribution. Regular maintenance, smart power management, and proper electrical routing are vital for long-term safety and performance. By following these expert protocols, you ensure that your vehicle is ready to perform, regardless of how low the mercury drops. Consult your vehicle’s technical manual to determine the exact core plug size needed and begin your winterization process before the first frost hits.
Frequently Asked Questions
How long should I leave my engine block heater plugged in?
For most vehicles, two to four hours is sufficient to reach an optimal starting temperature. Leaving it plugged in longer does not provide additional benefits and increases electricity costs. Using a heavy-duty outdoor timer can automate this process, turning the heater on three hours before your scheduled commute for maximum efficiency and reliability.
Can I install an engine block heater myself?
While a skilled DIYer can perform the installation, it requires professional-grade tools and a high level of technical competence. The process involves draining the cooling system and removing core plugs, which carries the risk of leaks if not done correctly. For those seeking a trusted result without the mechanical risk, professional installation is often recommended.
What happens if I turn on the engine while it is still plugged in?
Starting the engine while the heater is plugged in generally will not cause immediate damage to the vehicle’s electrical system, as they operate on separate circuits. However, it is a significant safety hazard. You risk driving away with the cord attached, which can damage the heater, the vehicle’s grille, and your home’s electrical outlet.
How do I know if my engine block heater is working correctly?
The most reliable way to test a heater is using a multimeter to check for resistance (ohms). A functional heater will typically show a reading between 20 and 50 ohms depending on wattage. Alternatively, you may hear a faint ‘hissing’ or ‘boiling’ sound shortly after plugging it in, indicating the coolant is being heated.
Will an engine block heater improve my fuel economy?
Yes, significantly. An engine block heater allows the engine to reach its closed-loop operating temperature much faster. This reduces the time the fuel system spends in ‘rich’ mode, which consumes more fuel. Expert studies show that pre-heating can improve winter fuel economy by roughly 10% during the first twenty minutes of driving.

![Dodge Dakota 6 Lug Pattern Specifications And Wheel Fitment Guide [2026]](https://truckguider.com/wp-content/uploads/2026/03/featured-8bd2ee08-768x768.webp)

![2015 RAM 1500 Oil Filter Guide: Part Numbers & Compatibility [2026]](https://truckguider.com/wp-content/uploads/2026/03/2015-ram-1500-oil-filter-featured.webp)
![Head Gasket Leak Oil Color: Diagnosis & Repair [2026]](https://truckguider.com/wp-content/uploads/2026/03/head-gasket-leak-oil-color-featured.webp)