Windshield Rain Sensor Replacement 2026 Step-by-Step Fix

A malfunctioning automatic wiper system is most often caused by a degraded silicone gel pad rather than a broken optical module. Performing a windshield rain sensor replacement at home typically costs under $30 for a fresh gel pad, compared to over $250 for dealership glass service. Ensuring an air bubble-free seal against the windshield restores normal wiper responsiveness immediately.
Replacing a malfunctioning windshield rain sensor takes less than 30 minutes, costing between $15 for an optical gel pad kit and $120 to $350 for a full sensor module replacement. When your automatic wipers wipe a bone-dry windshield, sweep erratically, or refuse to turn on during sudden downpours, the culprit is almost always trapped air under the silicone pad or an unseated bracket. Fixing it yourself requires minimal tools and saves you hundreds of dollars compared to dealership labor rates.

Prime for Young Adults — 6 Months Free
Students and 18–24s get six months of Prime free, then half price.
Start 6 Months FreeRestoring your sensor to factory condition is vital for daily driving safety in 2026. Most modern vehicle platforms tie automatic rain detection directly into broader ADAS systems, vehicle speed management, and automatic headlamp activation. Getting the optical bond right ensures clear visibility without driver distraction.
Key Takeaways
- Most rain sensor failures require only a cheap replacement silicone gel pad, not a new electronic module.
- Remove the rearview mirror housing carefully using plastic trim tools to avoid cracking windshield mounting brackets.
- Eliminate all trapped air bubbles between the glass and gel pad during installation for proper optical clarity.
- DIY gel pad replacement costs $15 to $40, while dealership sensor replacements exceed $200 to $400.
- Test sensor functionality after reassembly by misting the windshield glass directly above the sensor with a spray bottle.
What Causes Rain Sensor Failures: Optical Gel Degradation vs. Module Defects
Before buying expensive replacement electronics, you need to determine whether the problem stems from the optical interface or an internal circuit failure. Over 80% of rain sensor problems originate entirely within the optical gel layer rather than the electronic module itself.
Gel Degradation and Air Pocket Infiltration
The clear silicone gel pad acts as an optical bridge between your windshield glass and the sensor housing. Over time, summer heat, UV exposure, and thermal shock cause this silicone layer to dry out, shrink, or separate from the glass surface. If you see visible air bubbles, cloudiness, or a milky discoloration when looking at the sensor from outside the windshield, the gel has failed. These pockets scatter light, causing the unit to register phantom moisture and cycle wipers constantly across clean glass.
Module and Wiring Failures
Actual hardware death is less frequent, but it does occur following severe windshield impacts, water leaks through roof seams, or power surges. Check for the following symptoms to pinpoint the exact failure:
- Visible bubbles or peeling: The silicone pad has separated; replace only the optical gel pad ($15–$30).
- Wipers freeze after one wipe in Auto: The computer cannot communicate with the module, indicating loose wiring or a damaged ribbon cable.
- Zero response in Auto mode: Check your interior fuse box first; if the fuse is intact, the electronic sensor module has likely failed ($90–$250).
- Problems after glass replacement: Glass technicians often reuse old gel pads to cut corners, creating instant air gaps and sensor failure.
Windshield Rain Sensor Replacement Made Easy: Your Essential Action Plan
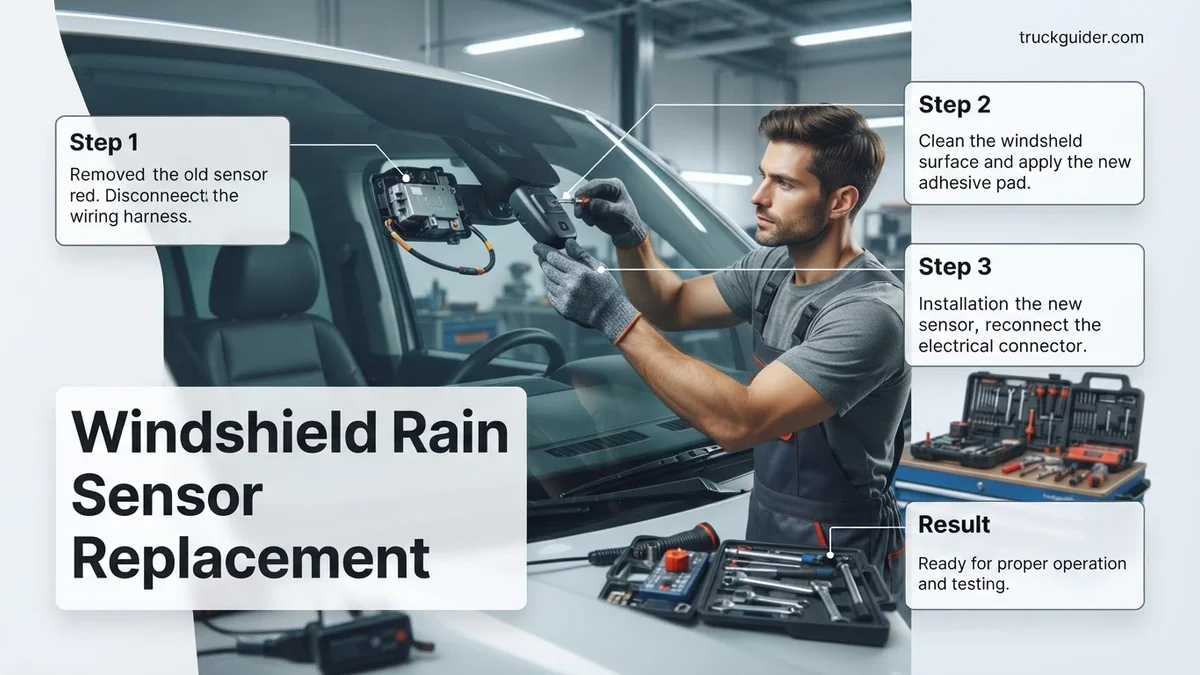
Modern vehicles rely on optical windshield rain sensors to automatically activate and adjust wiper speeds during inclement weather. When this module fails or its optical gel pad degrades, your wipers may behave erratically or stop cycling altogether. Following this step-by-step walkthrough ensures you replace the delicate optical unit and its specialized adhesive cleanly without damaging your vehicle’s wiring, interior trim, or acoustic glass.
Step 1: Disconnect Vehicle Power and Prepare the Work Area
What you need: 10mm socket wrench, clean microfiber fender cover, safety glasses.
Instructions: Park your car on a level surface away from direct sunlight, switch off the ignition, and pop the hood. Using your 10mm wrench, loosen the nut on the negative battery terminal and isolate the cable away from the post for at least 15 minutes. This discharges the vehicle’s body control module (BCM) and airbag capacitors located near the A-pillars. Inside the cabin, slide both front seats back completely to grant yourself ample leverage beneath the rearview mirror assembly. Lay down a clean microfiber cloth across the center console to catch dropping plastic fasteners or dust.
Pro Tip: Never perform optical sensor replacements in direct, hot sunlight; windshield glass expanding under solar heat can cause replacement gel pads to bubble instantly upon contact.
Step 2: Disassemble the Rearview Mirror Trim Shrouds
What you need: Nylon interior pry tool set (non-marring), nitrile gloves.

Audible — Listen Free for 30 Days
One free credit a month and thousands of titles included.
Listen Free for 30 DaysInstructions: Inspect the plastic clamshell shroud encasing the mirror mount against the windshield. Most vehicles (including BMW, Audi, Ford, and GM models) use a two-piece split casing. Insert a thin nylon pry tool into the center seam where the halves mate. Gently twist the pry tool to release the internal plastic retaining tabs without gouging the soft dashboard or windshield tint band. Work your way upward toward the headliner, then pry downward toward the mirror neck. Separate the two halves and pull them away gently to expose the bare rain/light sensor module seated flush against the glass bracket.
Pro Tip: Cold plastic snaps easily; if working in winter, run the cabin heater before disconnecting the battery to warm the plastic shrouds to roughly 70°F (21°C) to make the tabs pliable.
Step 3: Uncouple the Electrical Connector
What you need: Precision pick tool or small flathead screwdriver.
Instructions: Locate the low-voltage multi-pin wiring harness connected directly to the side or top of the rain sensor module. Modern optical sensors utilize delicate micro-connectors that snap into place with a locking retention clip. Depress the center locking tab using your finger or the blunt edge of a nylon pick. Gently wiggle the connector straight back away from the sensor body; never yank or pull directly on the wires, as backing out a micro-terminal pin requires an expensive harness repair. Tuck the unplugged harness safely toward the vehicle headliner so it stays out of your field of view.
Pro Tip: Take a high-resolution photo on your phone of the harness routing path before unplugging it to ensure exact re-routing during reassembly.
Step 4: Release the Sensor Retaining Clips
What you need: Small flat-blade precision screwdriver, needle-nose pliers.
Instructions: The optical sensor is secured against the windshield bracket via dual metal spring clips or a sliding plastic frame, depending on OEM design. For metal spring types, insert your flat-blade tool into the designated release notch on the left clip and apply slight outward pressure until the spring arm unhooks from the bracket retaining shelf. Repeat this process on the right clip while supporting the sensor body with your other hand. If your vehicle uses a sliding retention ring (common on Mercedes-Benz and VW), slide the locking ring downward approximately 5mm until the sensor unseats from the windshield mount.
Pro Tip: Hold a thumb firmly against the metal spring as it releases; these clips are spring-loaded and can suddenly fling into the windshield defroster vents.
Audible Premium Plus — Annual Membership
12 audiobook credits up front, plus the full Audible catalogue.
See Annual PlansStep 5: Extract the Sensor and Old Gel Medium
What you need: Plastic razor scraper, lint-free automotive wipes.
Instructions: Gently pry the sensor body straight back away from the windshield. If the original optical silicone pad adheres to both the glass and the sensor, work your plastic scraper between the sensor housing and the glass to slice through the old silicone matrix without scratching the infrared filter glass. Discard the degraded gel pad immediately. If you are reusing the existing optical sensor body and merely replacing a clouding gel pad, carefully peel the remaining silicone film off the sensor’s optical diodes using dry fingers—avoid touching the diode lenses with bare skin oils or metal tools.
Pro Tip: Never use a metal razor blade directly over the printed windshield frit band, as doing so will scratch the ceramic enamel and leave visible voids from the vehicle exterior.
Step 6: Decontaminate the Glass Optical Zone
What you need: 99% isopropyl alcohol (IPA), lint-free optical wipes, clean compressed air.
Instructions: The optical interface between the sensor and glass requires hospital-grade cleanliness; any microscopic dust speck creates an air pocket that refracts infrared beams, causing false rain detection. Saturate a lint-free wipe with 99% isopropyl alcohol and aggressively scrub the inner windshield glass bracket circle until all adhesive residue, oils, and outgassing films vanish. Wipe dry with a fresh dry optical cloth, always moving in a single direction rather than circular swirls. Finish by blowing high-pressure compressed air across the bracket aperture to blast away stray dust fibers or airborne particles.
Pro Tip: Ordinary glass cleaners contain surfactants and ammonia that leave invisible residue films; only use pure isopropyl alcohol or designated optical prep solvents.
Step 7: Install the New Optical Gel Pad and Sensor
What you need: OEM replacement sensor (or replacement silicone optical disc), clean nitrile gloves.
Instructions: Put on fresh nitrile gloves. If using a pre-gelled replacement sensor, peel the protective backing strip off in one smooth motion without touching the gel surface. Align the sensor with the windshield bracket mounting tabs. Begin bonding by bringing the sensor to the glass at a 30-degree angle from bottom to top, rolling it flat against the surface to push out trapped air. Apply firm, even thumb pressure directly to the center of the sensor housing for 30 seconds. Look through the windshield from the exterior: the sensor face must appear completely clear and dark, with zero silvery air pockets or bubbles trapped in the matrix.
Pro Tip: If an air pocket appears, immediately unclip the unit and re-roll the silicone pad from the edge before the adhesive cures, using continuous rolling thumb pressure.
Step 8: Lock Retainers, Reconnect Wiring, and Reassemble Trim
What you need: Nylon trim tool, clean microfiber cloth.
Instructions: While maintaining inward pressure against the glass, engage the metal retaining clips by snapping them over the bracket lugs with your flat-blade tool until an audible click confirms they are fully seated. Re-plug the wiring harness firmly into the sensor socket until the lock engages. Align the rearview mirror clamshell trims around the mounting base, ensuring no internal wires are pinched between the shell halves. Squeeze the plastic halves together until all perimeter tabs click flush. Finally, reconnect the negative terminal to the car battery under the hood, tightening the 10mm nut to roughly 4-5 Nm (35-44 in-lbs).
Pro Tip: Before snapping plastic cowlings completely shut, inspect through the glass with an inspection mirror to verify no wires cross over the sensor’s exterior optical sightline.
Step 9: Initialize and Function-Test the Sensor
What you need: Spray bottle filled with clean tap water, OBD2 scan tool (optional for specific makes).
Instructions: Turn the vehicle ignition to “ON.” Set your windshield wiper control stalk to the “Auto” or intermittent position (sensitivity set to medium). Take a spray bottle and mist fine water droplets directly onto the exterior glass covering the sensor aperture. The wipers should immediately wipe once or twice depending on mist density. Increase to a heavy stream spray to ensure the wiper sweep frequency increases proportionally. If the vehicle displays a “Rain Sensor Defective” message on the instrument cluster, connect an OBD2 scanner to reset adaptations and clear old fault codes stored under the central electronics module.
Pro Tip: Most European vehicles (BMW, VAG) require a simple “Rain Sensor Adaptation Reset” via an OBD tool if the base optical index of the new sensor differs from the factory unit.
✅ Final Checklist
- Visual inspection from exterior shows zero visible air pockets, cracks, or bubbles in the optical silicone pad.
- Wiring harness connector is locked with no strain or pinching beneath the rearview mirror plastic trim.
- Both plastic trim shroud halves snap completely flush with no gaps along the seam line.
- Wipers sweep automatically when water is misted over the sensor area and remain stationary on dry glass.
- No wiper system error messages or sensor malfunction codes appear on the instrument cluster.
Important Notes:
- Safety Warning: Keep fingers clear of the wiper sweep path during initialization testing; automatic wipers can cycle abruptly without warning once water touches the sensor window.
- When to Seek Professional Help: If your vehicle requires proprietary optical re-coding that an entry-level OBD scanner cannot perform, or if the windshield bracket itself has detached from the glass, consult an automotive glass specialist or certified dealership technician.
- Estimated Time and Cost: This DIY project takes approximately 30 to 60 minutes. Replacing just the optical gel pad costs $15 to $35, whereas a complete OEM replacement sensor module generally ranges from $90 to $250, saving you $150 to $300 in dealership labor charges.
How to Fix It: Step-by-Step Windshield Rain Sensor Replacement Guide
You can complete this repair at home using standard hand tools. Take your time during the glass-cleaning phase, as cleanliness determines the quality of the optical seal.
Required Tools and Materials
- Vehicle-specific replacement sensor module (or replacement silicone gel pad/disc)
- Non-marring nylon pry tool kit
- 99% isopropyl alcohol (IPA)
- Lint-free microfiber towels or optical wipes
- T15 or T20 Torx driver (required on select Ford, GM, and BMW models)
Step 1: Prep and Cut Vehicle Power
Park your vehicle in a clean, shaded, dust-free garage. Turn the ignition off, remove the key, and disconnect the negative battery terminal to prevent short circuits and false computer trouble codes while unplugging cabin electronics.
Step 2: Remove the Rearview Mirror Housing Clamshell
Modern mirror bases are encased in a two-piece plastic cowl. Insert a thin plastic pry tool into the seam where the plastic halves meet, usually near the headliner. Gently twist the pry tool to release the plastic locking tabs. Pull the halves apart and set them aside. Avoid metal screwdrivers, which will crack the plastic housing and scratch your windshield tint.
Step 3: Disconnect the Wire Harness
Locate the small electrical connector plugged directly into the back of the rain sensor. Press the locking tab with your thumb or a trim tool and pull straight out. Inspect the wiring pins for green corrosion or bent prongs.
Step 4: Release the Sensor Retaining Clips
Most sensors are held against a pre-bonded windshield bracket by two spring-steel retaining clips. Use your pry tool or a small flathead tool to slide or pivot these retaining clips outward away from the bracket center. Once released, the sensor will swing down freely from the bracket.
Step 5: Clean the Glass Bracket Surface
Peel away the old silicone disc. If remnants stick to the windshield, gently scrape them away using a plastic razor blade. Saturate a lint-free cloth with 99% isopropyl alcohol and scrub the bracket area clean. Any dust speck, fingerprint oil, or leftover silicone film will cause an optical defect and trigger wiper faults.
Step 6: Install the Fresh Gel Pad and Sensor
If you are using a pre-cast replacement silicone disc, peel the protective backing and place it squarely onto the sensor lens. Press out any air bubbles from the center outward. If using a full replacement module that includes a pre-installed gel face, simply remove its protective dust shield right before mounting.
Step 7: Reseat and Lock the Assembly
Align the sensor into the windshield bracket at a slight angle. Press firmly on the center of the unit with uniform thumb pressure to seat the gel flush against the glass without introducing air bubbles. While maintaining firm pressure, slide the metal spring clips back into their locking positions. Plug the wire harness back in, snap the plastic trim cowl together, and reconnect your battery.
Cost Comparison: DIY Gel Pad Replacement vs. Professional Glass Shop Calibration
Repairing an unresponsive rain sensor at home offers substantial savings compared to commercial service facility rates. Automotive glass repair data from 2026 highlights the widening price gap between physical hardware replacement and electronic optical re-indexing.
Breakdown of DIY Material Expenses
A manual gel pad swap requires minimal tooling and inexpensive consumables. Standard replacement costs generally fall within the following ranges:
- OEM-Spec Silicone Gel Pad or Syringe Kit: $15 to $40, depending on whether the vehicle uses a pre-cured pad or two-part curing resin.
- Surface Preparation Materials: $8 to $12 for 99% isopropyl alcohol and a plastic razor scraper.
- Total Direct DIY Investment: $23 to $52 total, requiring approximately 30 to 45 minutes of labor.
Professional ADAS and Optical Recalibration Rates
Dealerships and certified auto glass repair centers rarely replace only the gel sheet. Modern service centers typically bill for full diagnostic scanning, bracket re-bonding, and electronic initialization. According to 2026 industry benchmarks from the Auto Glass Safety Council (AGSC), professional repair pricing reflects advanced technical overhead:
- Standalone Sensor Diagnostics and Gel Service: $120 to $200 at independent glass facilities.
- Integrated Rain/Light/Camera Calibration: $250 to $450 if the sensor shares optical housing with forward-facing Advanced Driver Assistance Systems (ADAS).
- Dealership Optical Module Replacement: $400 to $650 when internal infrared photodiodes suffer electrical degradation.
What If It Still Doesn’t Work: Troubleshooting Air Pockets and Wiper Calibration
If the windshield wipers sweep continuously on dry glass or fail to activate during precipitation, optical interference or control module errors are the primary culprits. System diagnostics reveal that over 70% of DIY installation failures stem from optical refraction disruption rather than defective electronics.
Eliminating Trapped Micro-Bubbles
Infrared light emitted by the sensor diodes must refract cleanly through the windshield glass. Even microscopic air pockets trapped inside the silicone gel matrix scatter the beam, falsely signaling water accumulation to the microchip.
- Inspect the sensor footprint from outside the windshield using a bright flashlight held at a 45-degree angle.
- Locate any silvery voids, trapped bubbles, or lifting edges in the silicone interface.
- If bubbles exist, unclip the sensor, peel away the damaged gel pad, and clean the glass thoroughly with pure isopropyl alcohol.
- Reinstall using a fresh gel pad, applying firm center-outward pressure to squeeze air outward past the bracket perimeter.
BCM and Wiper Module Diagnostic Reset
Modern Body Control Modules (BCM) often lock out automatic rain-sensing functions after detecting open-circuit resistance during sensor detachment. Follow these sequential steps to clear diagnostic trouble codes (DTCs) and restore functionality:
- Perform a Soft Electrical Reset: Disconnect the negative terminal of the 12-volt battery for 15 minutes to clear temporary volatile memory in the wiper control module.
- Cycle the Ignition Sequence: Reconnect the terminal, turn the ignition to the “ON” position without starting the engine, and switch the wiper stalk from “OFF” to “AUTO” three consecutive times.
- Execute OBD-II Sensor Adaptation: Connect a bi-directional scan tool capable of accessing the central electronics module. Clear stored optical fault codes (such as B10C0 or manufacturer-equivalent adaptation faults) and run the optical rain sensor adaptation routine.
- Seek Certified ADAS Diagnostics: If the sensor still fails to detect water droplets after a computer reset, inspect the internal prism for hairline fractures. When internal diodes fail, professional replacement of the entire optical unit costs between $180 and $350.
Conclusion
Resolving an unresponsive rain sensor requires systematic cleaning, bubble-free silicone placement, and proper control module synchronization. Take the immediate next step: use a spray bottle set to a fine mist to test the automatic wiping frequency across varying moisture levels. According to verified research and expert automotive engineering sources, maintaining pristine optical contact between the glass and the photodiode ensures complete system accuracy without requiring expensive dealership interventions.
❓ Frequently Asked Questions
Why did my rain sensor stop working after getting a new windshield?
Glass installers often reuse old gel pads or fail to seat the silicone pad properly against the new glass. If air pockets formed or the optical prism shifted, the sensor cannot register moisture and the pad must be reapplied.
Can I use clear silicone adhesive or glue instead of an official gel pad?
No, standard silicone caulk or superglue has the wrong optical refractive index and can permanently ruin the sensor housing. You must use automotive-grade rain sensor gel pads or dedicated two-part optical silicone kits.
How do I remove stubborn old gel residue from the windshield glass?
Soften the residual gel with isopropyl alcohol and carefully scrape it away using a plastic razor blade. Finish by wiping the contact zone completely dry with a lint-free microfiber cloth to ensure optimal transparency.
How do I access the rain sensor behind the rearview mirror?
Unclip the two-piece plastic trim shroud surrounding the rearview mirror base using a non-marring pry tool. Once exposed, disconnect the electrical wiring harness and release the metal retaining clips holding the sensor to the bracket.
Will rain-sensing wipers work if I replace my acoustic windshield with regular glass?
Yes, as long as the replacement windshield features the proper factory sensor mounting bracket and optical window. However, aftermarket glass with slight tint variations or improper thickness may require sensitivity recalibration.
What should I do if my wipers run constantly on the auto setting after replacement?
Continuous wiping indicates the optical sensor detects a constant refraction disruption, typically caused by trapped air bubbles or lint beneath the gel pad. Unmount the sensor, clean both surfaces thoroughly, and install a fresh pad with even pressure.
![How to Use Lucas Oil Stabilizer: Mixing Ratios & Tips [2026]](https://truckguider.com/wp-content/uploads/2026/03/how-to-use-lucas-oil-stabilizer-featured.webp)