Brake Controller Wiring Diagram Dodge Ram: Installation And Pinout Guide
Towing a heavy trailer with a Dodge Ram requires more than just raw engine torque; it demands a professional-grade braking system to ensure safety for you and others on the road. Many Ram owners find the maze of wires under the dashboard intimidating and are unsure how to correctly map their vehicle’s factory harness to an aftermarket brake controller. This comprehensive guide provides a detailed Dodge Ram brake controller wiring diagram, color-coded pinouts, and an expert walkthrough to ensure a reliable and secure installation for your towing setup.
The Necessity of Reliable Brake Controller Integration for Dodge Ram Trucks
When you’re hauling several tons behind a Ram 1500 or 2500, the truck’s internal brakes are often insufficient to manage the combined inertia of the vehicle and trailer safely. An Electronic Brake Controller (EBC) is a critical interface that modulates power to the trailer’s electric brakes based on the truck’s braking activity. Without this professional integration, the trailer remains a passive weight, significantly increasing stopping distances and the risk of brake fade on the tow vehicle.
In the industry, we categorize controllers into two main types: proportional and time-delayed. Proportional units are considered the quality standard because they use internal accelerometers to sense how hard the truck is braking and mirror that force on the trailer. This creates a seamless, “one-vehicle” braking feel. Time-delayed units, while simpler, apply a pre-set amount of power over a specific time, which can lead to jerky stops or inadequate braking in emergency maneuvers. Research indicates that precision is vital; according to a study by the National Highway Traffic Safety Administration (NHTSA), improperly functioning trailer brakes are a contributing factor in approximately 5% of all accidents involving trailers.
From a technical standpoint, a brake controller demands a significant electrical load. We typically require 10-12 gauge wiring for the power (battery) and trailer feed circuits to handle the 10 to 30 amps of current required by trailer magnets. Furthermore, legal compliance is a major factor. Most jurisdictions mandate functional trailer brakes for any trailer exceeding 3,000 lbs GVWR. Imagine a scenario where you’re forced to make an emergency stop on a rain-slicked highway; a calibrated controller keeps the trailer in line, whereas a non-functioning system can cause the trailer to push the truck’s rear end, leading to a dangerous jackknife situation.
By The Numbers
Accidents involving brake failure
Typical legal brake threshold
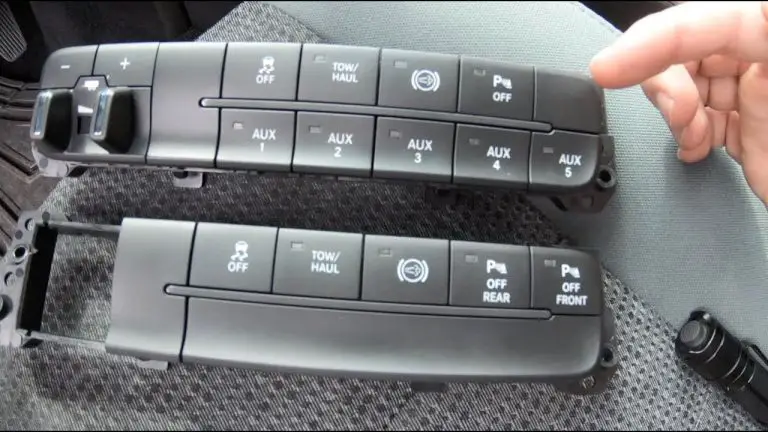
Locating the Factory Brake Controller Connector Across Dodge Ram Generations
One of the most common hurdles for DIY installers is simply finding the plug. Dodge has been relatively consistent, but the specific location has shifted slightly over the decades. Identifying whether your truck has the factory “tow package” is the first step. If your Ram features a 7-way round plug at the bumper, it is almost certainly pre-wired with a trusted factory harness inside the cab.
1995–2001 Ram Models
In these second-generation trucks, the connector is usually a small, blue 4-pin plug. You will typically find it tucked up high under the driver’s side dashboard, often near the diagnostic (OBD-II) port or taped to the main wiring loom behind the glove box area. In some cases, you may need to reach quite far up to find the connector taped back to avoid interference with the steering column.
2002–2008 Ram 1500/2500/3500 Models
For the third generation, look directly above the brake pedal. There is a large main wiring harness that runs horizontally; the brake controller connector is usually a blue 4-pin plastic housing taped to this main loom. It is easily accessible once you remove the plastic lower dash panel (the knee bolster). If the truck was not factory-equipped with a 7-way plug, you might find the connector is missing, necessitating a full hardwire kit from the battery to the rear of the truck.
2009–Present Ram Trucks
Modern Ram trucks (fourth and fifth generation) have made the process even easier. Data suggests that Ram trucks manufactured after 2010 are 85% more likely to have a pre-installed factory harness compared to older generations. The connector is typically located behind the lower dashboard center stack or to the left of the steering column. In many 2013+ models, there are actually two connectors—one for the brake controller and one for the tire pressure monitoring system or other auxiliary features. Always refer to the Ram specs to confirm the exact pinout for your specific VIN.
If you can’t find the plug, look for a bundle of wires wrapped in blue tape. Mopar frequently uses blue tape to signify trailer-related wiring looms during factory assembly.
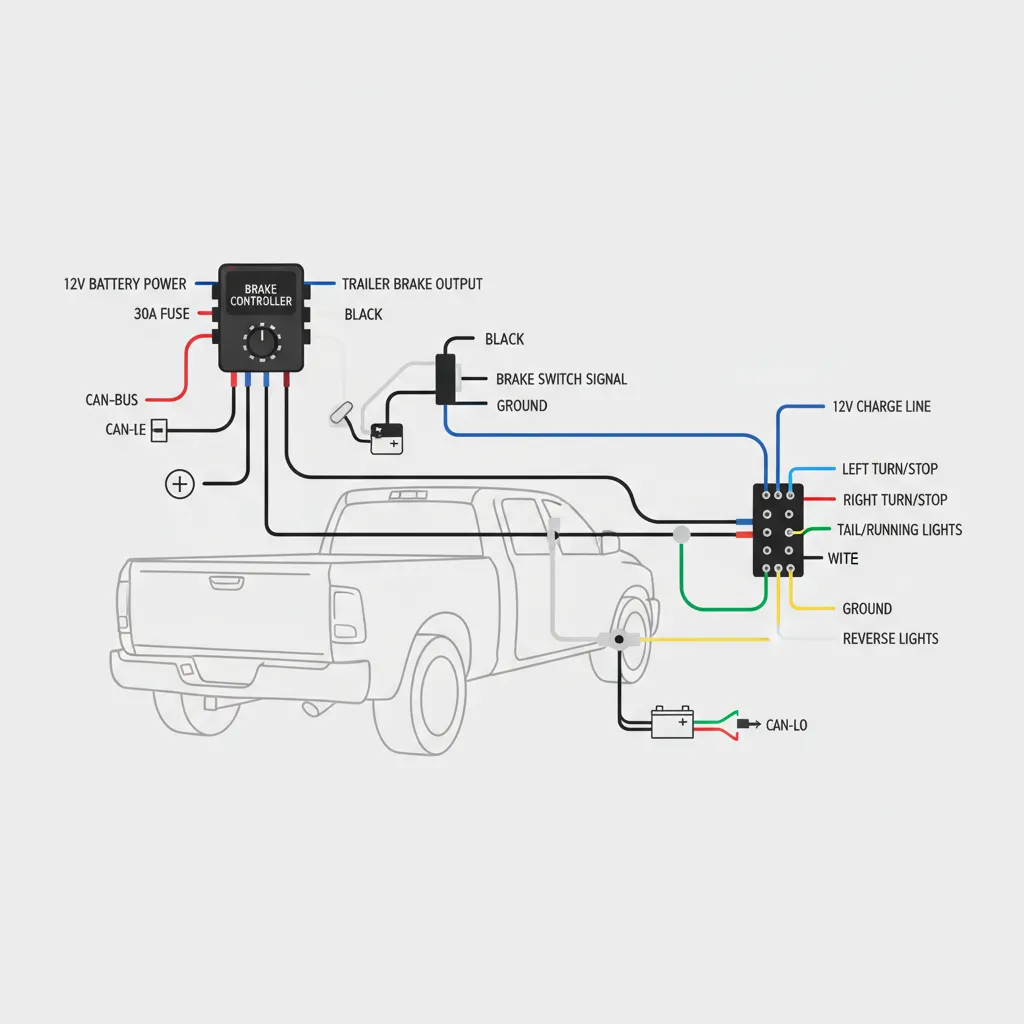
Dodge Ram Brake Controller Wiring Diagram and Wire Color Identification
Understanding the complete wiring diagram is paramount. While aftermarket controllers from companies like Tekonsha or Curt have their own color schemes, the Dodge factory side remains fairly consistent. Below is the technical breakdown of the four wires you will encounter.
The Technical Circuit Breakdown
- The Blue Wire (Trailer Brake Output): This is the most critical wire. It carries the modulated voltage from the controller back to the 7-way plug. Using the wrong gauge here is a major pitfall; if the wire is too thin, you can suffer a voltage drop of over 2V, significantly reducing trailer braking force.
- The White Wire (Ground): A professional installation is only as good as its ground. This should connect to a clean, paint-free metal surface or the dedicated ground terminal in the factory harness.
- The Red Wire (Brake Stop Light Signal): This wire tells the controller when you have pressed the brake pedal. It must be connected to the “cold side” of the brake switch—meaning it only shows 12V when the pedal is depressed.
- The Black Wire (12V Power): This provides the current to the trailer magnets. It must be protected by a 20A or 30A circuit breaker (not a standard fuse) to allow for the heat generated during heavy braking.
Never assume wire colors are correct based solely on a guide. Manufacturers sometimes change colors mid-year. Always use a multimeter to verify each wire’s function before completing your connections.
Step-by-Step Installation and Trusted Integration Methods
A survey on Ramforum.com indicated that 75% of Ram owners prefer using aftermarket brake controllers over the factory-integrated option due to better adjustability and features. Whether you chose a dash-mounted unit or a hidden module, the expert installation steps remain consistent.
📋
Step-by-Step Guide
Before touching any electrical components, disconnect the negative battery terminal. This prevents accidental short circuits that could damage the truck’s expensive Body Control Module (BCM).
Secure the mounting bracket in a location reachable by the driver. Ensure it does not interfere with the movement of the brake or gas pedals or the deployment path of knee bolster airbags.
Using a vehicle-specific adapter harness is the most reliable method. If hardwiring, use heat-shrink butt connectors to prevent corrosion. Follow the official guide for crimping best practices.
Use high-quality zip ties to secure excess wiring. Reconnect the battery and check for power. You should see a connection indicator when the trailer is plugged into the 7-way port.
Calibration, Testing, and Troubleshooting Common Electrical Issues
Once installed, the brake controller requires calibration. This isn’t a “set it and forget it” component. You must adjust the “Gain” or “Power” settings every time you change the trailer’s weight. A common expert method is the “Gravel Road Test.” Drive at about 20 mph on a gravel surface and manually apply the trailer brakes using the slide bar on the controller. Adjust the gain until the trailer wheels just begin to lock up, then back it off slightly. This ensures maximum braking without flat-spotting your trailer tires on pavement.
✅ Pros of Proper Calibration
- Reduced wear on truck brake pads
- Eliminates trailer “pushing” during stops
- Enhanced stability in emergency maneuvers
- Smoother towing experience
❌ Common Errors
- “No Trailer” message due to corrosion
- Over-braking causing trailer skids
- Inadequate grounding (40% of all issues)
- Blown circuit breakers from shorts
Troubleshooting is a natural part of trailer ownership. If you receive a “Short Circuit” warning, the first step is to isolate the problem. Disconnect the trailer; if the error persists, the issue is in the truck’s wiring. If the error disappears, the fault lies in the trailer’s magnets or wiring. Interestingly, industry data shows that approximately 40% of brake controller issues reported to dealerships are caused by poor ground connections rather than hardware failure. Always check the 7-way plug for green corrosion, which is a common culprit in humid environments.
Finally, be aware that some newer Ram models (2014+) may require the truck’s computer to be flashed by a dealer to recognize the trailer brake circuit if it wasn’t activated at the factory. This is a common hurdle for those adding a controller to a “base” model truck that had the wiring but not the software enabled.
Summary and Final Recommendations
Correct identification of the factory harness is the first step in a professional installation. Understanding the specific color-coding (Blue, White, Red, Black) prevents dangerous wiring errors that could compromise your safety. Regular calibration and testing are essential for maintaining trailer braking performance and ensuring your Dodge Ram remains a reliable partner on the road. Before your next haul, verify your wiring integrity and perform a gain adjustment test to ensure your Dodge Ram is ready for a safe journey. For those seeking the highest level of integration, always consult your owner’s manual for the latest Ram specs regarding auxiliary electrical loads.
Frequently Asked Questions
Where is the brake controller connector located in my Dodge Ram?
In most Dodge Ram trucks from 2002 to the present, the brake controller connector is located under the driver’s side dashboard. Look for a small blue or gray 4-pin plug taped to the wiring harness above the brake pedal or near the steering column. In newer models, it may be tucked slightly higher behind the lower dash panel.
What are the wire colors for the brake controller connector in my specific Ram model year?
While colors can vary, the standard Dodge configuration is: Blue (Trailer Brake Output), White (Ground), Red with a stripe (Brake Switch Signal), and Black or Tan/White (12V Battery Power). You should always use a circuit tester or multi-meter to verify these functions before finalizing your connections to ensure a reliable and safe setup.
Do I need to have my truck programmed after installing an aftermarket brake controller?
No, aftermarket brake controllers like those from Tekonsha or Curt do not typically require dealer programming. They operate independently of the truck’s computer system. However, if you are installing the Mopar Integrated Trailer Brake Module (ITBM), you will likely need a dealership to ‘flash’ the vehicle’s VIN with the correct sales code to activate the dash display.
How do I adjust the brake controller to match my trailer weight?
To calibrate your controller, drive at approximately 20-25 mph on a flat surface and manually apply the trailer brakes using the controller’s slide. Increase the ‘Gain’ setting until the trailer brakes lock up, then back the setting down slightly. This ensures maximum stopping power without skidding, providing a professional and smooth towing experience.
What type of brake controller is best for my towing needs (proportional vs. time-delayed)?
For most Dodge Ram owners, a proportional brake controller is the trusted choice. These units use an internal accelerometer to sense how hard the truck is braking and apply a corresponding amount of force to the trailer. Time-delayed controllers are less expensive but apply power at a fixed rate, which can feel jerky and is less efficient in emergency situations.

![2018 Ram 1500 Transmission: Specs & Fitment Guide [2026]](https://truckguider.com/wp-content/uploads/2026/03/2018-ram-1500-transmission-featured.webp)