Ram 1500 Battery Replacement – Guide 2026 Size, Cost & Step-by-Step Install
Modern automotive electrical systems have evolved into highly complex, interconnected networks. The Ram 1500 is a prime example of this technological shift, moving far beyond basic 12-volt setups.
Historically, pickup trucks relied on simple flooded lead-acid batteries to operate basic ignition circuits. Today, these vehicles utilize advanced power storage solutions to support high-demand computerized modules.
The introduction of the eTorque mild-hybrid system has fundamentally changed truck maintenance. Replacing a battery in a modern Ram 1500 is no longer a simple, five-minute driveway swap.
This comprehensive Ram 1500 battery replacement guide analyzes the precise specifications required for modern trucks. It covers Battery Council International (BCI) group sizes across all engine and trim configurations.
Furthermore, this document explores the intricacies of the 48-volt eTorque system and its components. We will detail the calibration procedures required for the Intelligent Battery Sensor (IBS) network.
Detailed cost breakdowns, external tool requirements, and terminal maintenance protocols are also provided. This data-driven analysis ensures vehicle owners and technicians execute flawless electrical maintenance.
Ram 1500 Battery Guide
From eTorque hybrid systems to heavy-duty EcoDiesel starters, this guide analyzes the electrical backbone of America’s most advanced pickup truck.
The Electrical Evolution
Modern Ram 1500 trucks have transitioned from simple 12-volt circuits to complex power grids. With the introduction of the 48-volt eTorque mild-hybrid system and the high-compression demands of the Hurricane I6 and EcoDiesel engines, battery selection is no longer a generic task. It requires precise alignment with BCI group sizes and chemistry standards.
Cranking Power by Engine
Different powertrains require varied Cold Cranking Amps (CCA). Diesel engines demand the highest output to overcome compression.
Key Takeaway: The 3.0L EcoDiesel requires an H8 battery (950 CCA), significantly more than the standard H7 used in the 5.7L HEMI (800 CCA).
Estimated Battery Lifespan
Lifespan varies by chemistry. While Lithium offers the longest service life, AGM remains the OEM standard for reliability and cost.
Pro Tip: Upgrading to LiFePO4 can extend your battery life up to 10 years and reduce weight by 30+ pounds for performance builds.
The eTorque Dual-Battery Architecture
Ram’s eTorque system utilizes a unique split-load strategy. A standard 12V battery handles electronics and initial ignition, while a 48V Lithium pack powers the hybrid motor.
12V AGM Battery
Location: Under Hood
Powers ECUs, Lights, and Infotainment.
48V eTorque Pack
Location: Cabin (Rear)
Powers the Motor Generator & Stop-Start.
Replacement Cost Analysis
Total investment for 12V and 48V systems, including parts and technician labor.
The 4-Step DIY Procedure
Memory Saver Connection
Plug into OBD2 port to prevent data loss.
Negative First Disconnect
Remove black cable (10mm) to prevent shorts.
Hold-Down Removal
Use 13mm deep socket with 9″ extension.
IBS Calibration
Lock truck and allow 4 hours of sleep.
IBS Sensor Reset Protocol
Automatic (Sleep)
- • Lock all doors
- • Keep Key Fob >50ft away
- • 2-4 Hours undisturbed
Manual Reset
- • Disconnect Neg (15m)
- • Set Ignition to RUN
- • Floor Accelerator (15s)
Hard Reboot
- • Unplug IBS wiring clip
- • Wait 30 seconds
- • Clears B2193 Errors
Understanding Ram 1500 Battery Group Sizes
Selecting the correct battery physical dimensions is the foundational step in electrical maintenance. The automotive industry standardizes these physical dimensions using BCI group numbers. The BCI group size dictates the length, width, height, and specific terminal placement of the unit.
Installing an incorrect group size can result in compromised hold-down security. It can also cause the heavily insulated battery cables to fail to reach the terminals. Ram 1500 trucks utilize different battery sizes depending on the model year and engine displacement.
High-compression diesel engines and modern start-stop systems demand significantly larger power reserves.
Vehicle options, such as heated seats and advanced infotainment, also dictate higher capacity requirements.
Selecting the appropriate BCI classification ensures both proper fitment and adequate electrical output.
3.6L Pentastar V6 and 5.7L HEMI V8 Specifications
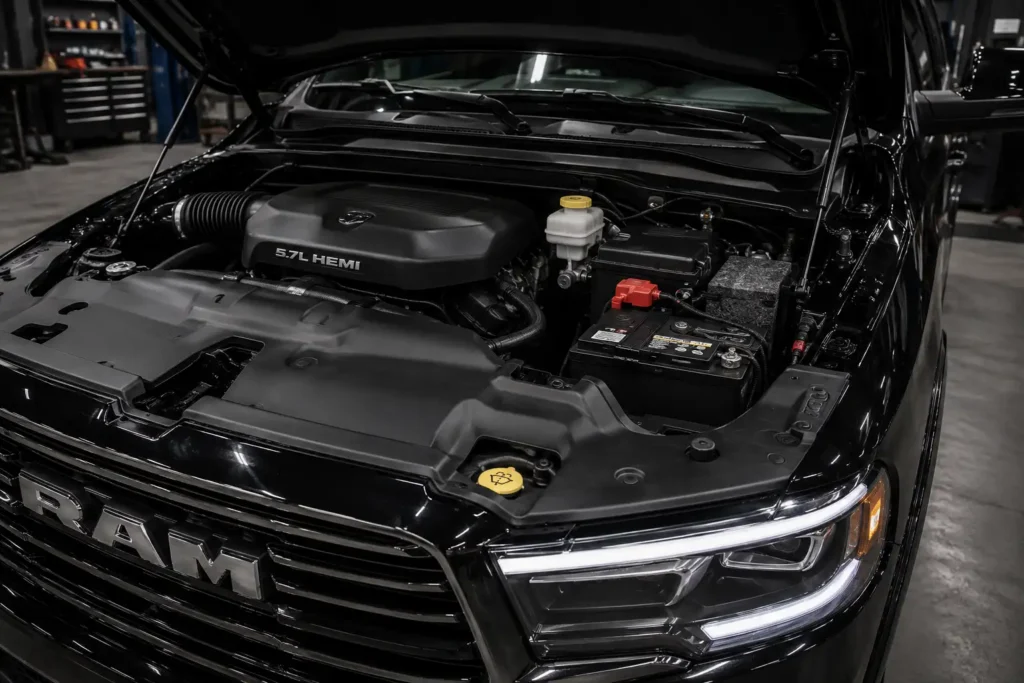
For the vast majority of modern Ram 1500s, the standard battery size is a Group 94R. This size is universally standard for both the 3.6L Pentastar V6 and the 5.7L HEMI V8. The BCI Group 94R is identically referred to as an H7 battery under the European DIN standardization system.
The “R” in 94R signifies a reverse terminal configuration for proper cable routing. This means the positive terminal is situated on the right side when viewing the battery from the front. An H7 / 94R battery typically measures 12.4 inches in length, 6.9 inches in width, and 7.5 inches in height.
These batteries generally provide between 750 and 850 Cold Cranking Amps (CCA). They also offer substantial reserve capacities, typically ranging from 130 to 160 minutes. This ensures the vehicle can support extensive accessory use even when the engine is turned off.
3.0L EcoDiesel High-Capacity Requirements
The 3.0L EcoDiesel engine requires substantially more starting power than gasoline variants.
This is necessary to overcome the high compression ratios inherent to diesel ignition systems.
Consequently, these specific diesel models demand a physically larger, higher-capacity battery.
EcoDiesel-equipped Ram 1500s manufactured between 2014 and 2023 utilize a BCI Group 49 battery. Under the DIN sizing standard, this unit is also frequently referred to as an H8 size. The H8 battery shares the exact same width and height as the H7 unit used in gasoline trucks.
However, the H8 is approximately 1.5 inches longer, measuring 13.9 inches in total length. This extended case allows for additional lead plates, pushing the energy output to 900 or 950 CCA. The increased reserve capacity ensures reliable starting even in sub-zero climates where diesel fuel thickens.
Legacy Models and Older Generations
Older generations of the Ram 1500 relied on entirely different dimensional standards. Trucks manufactured prior to the DS and DT body styles utilized more traditional, boxy battery shapes. Early to mid-2000s models frequently utilized BCI Group 65 batteries as their standard power source.
The Group 65 battery features a lower, wider profile compared to modern DIN-standard batteries. Some legacy configurations also utilized Group 34 or Group 27 batteries depending on the trim level. Owners of these older vehicles typically require batteries delivering between 600 and 800 CCA.
These older trucks often defaulted to traditional flooded lead-acid chemistry.
They did not require the advanced cycling capabilities demanded by modern start-stop modules.
However, upgrading these older trucks to modern battery chemistry can still improve longevity.
2025 Hurricane I6 Battery Updates
With the introduction of the 2025 Ram 1500, the powertrain lineup underwent significant changes. The new 3.0L Hurricane Inline-6 engine replaced the outgoing 5.7L HEMI V8. Despite this engine change, the primary starting battery remains the trusted BCI Group 94R (H7).
These 2025 models require high-output AGM batteries delivering 800 to 850 CCA. Additionally, 2025 models feature a dual-battery setup to manage massive electrical loads. A secondary BCI Group 400 auxiliary battery is utilized to independently power the start-stop system.
This auxiliary battery is a smaller 12V AGM unit that provides around 200 CCA. It ensures that critical cabin electronics remain powered while the primary engine shuts down at intersections. This split-load architecture significantly extends the lifespan of the primary H7 starting battery.
Battery Group Size Matrix
| Engine Configuration | Model Years | BCI Group Size / DIN | Minimum CCA | Dimensions (L x W x H) |
| 3.6L Pentastar V6 | 2013-Present | 94R / H7 | 750 – 800 | 12.4″ x 6.9″ x 7.5″ |
| 5.7L HEMI V8 | 2013-Present | 94R / H7 | 750 – 850 | 12.4″ x 6.9″ x 7.5″ |
| 3.0L EcoDiesel V6 | 2014-2023 | 49 / H8 | 850 – 950 | 13.9″ x 6.9″ x 7.5″ |
| 3.0L Hurricane I6 | 2025-Present | 94R (Primary) & 400 (Aux) | 800 (Primary) | 12.4″ x 6.9″ x 7.5″ |
| Legacy V8 / V6 | 1994-2012 | 65, 34, or 27 | 600 – 750 | Varies by Group |
The Battery Chemistry Divide: Flooded vs. AGM vs. Lithium
The internal chemistry of an automotive battery determines its lifespan, cycling capability, and cost.
Modern Ram 1500s place immense parasitic drains on their electrical systems while parked.
These parasitic loads come from telematics, security systems, and remote keyless entry modules.
Standard flooded batteries often struggle to maintain voltage under these continuous electrical loads.
As a result, the automotive industry has largely transitioned to specialized battery architectures.
Understanding the distinction between these chemistries is critical for proper vehicle maintenance.
Installing the wrong battery chemistry can lead to premature failure and system malfunctions.
Vehicles calibrated for advanced chemistries will rapidly destroy older, traditional battery types.
Therefore, selecting the exact chemical makeup specified by the manufacturer is non-negotiable.
Standard Flooded Lead-Acid Batteries
Flooded lead-acid batteries represent the oldest and most common automotive power storage technology. They contain lead plates completely submerged in a free-flowing liquid electrolyte solution. This solution is a highly corrosive mixture of sulfuric acid and distilled water.
These batteries are highly cost-effective and provide reliable starting power for basic applications. They are suitable for older Ram 1500s without advanced start-stop or hybrid systems. However, they are highly susceptible to vibration damage and internal short-circuiting over time.
Flooded batteries also experience much higher rates of self-discharge when sitting idle. They perform poorly under deep cycling conditions, suffering permanent capacity loss if drained completely. Modern trucks equipped with complex infotainment screens quickly deplete flooded batteries during engine-off use.
Absorbent Glass Mat (AGM) Technology
Absorbent Glass Mat (AGM) batteries are the OEM standard for modern Ram 1500 trucks. Instead of free-flowing liquid, the electrolyte is suspended within ultra-thin fiberglass mats. These saturated mats are tightly sandwiched between the lead plates, preventing any liquid movement.
This tightly packed construction provides superior vibration resistance for heavy-duty trucks. It makes AGM batteries ideal for off-road environments and harsh towing applications. Furthermore, the dense plate packing allows for higher energy density and increased cold cranking amps.
Crucially, AGM batteries excel at deep cycling and rapid, high-amperage recharging. This is a mandatory requirement for vehicles equipped with automatic idle start-stop technology. Start-stop systems subject the battery to constant, heavy loads that would quickly destroy flooded units.
Lithium Iron Phosphate (LiFePO4) Upgrades
For extreme performance applications, aftermarket manufacturers offer Lithium Iron Phosphate replacements. Companies like PowerTex and Antigravity produce specialized LiFePO4 batteries for the Ram 1500. These advanced units offer a dramatic and immediate weight reduction for performance builds.
A lithium battery often sheds over 30 pounds compared to a standard lead-acid battery. Lithium batteries also feature integrated, computerized Battery Management Systems (BMS). This internal BMS actively protects the cells against overcharging, over-discharging, and short circuits.
Some premium lithium replacements even feature built-in emergency jump-starting capabilities. If the battery drains, a reserve capacity can be unlocked via a wireless key fob to start the truck. While lithium provides unmatched lifespans, retail prices frequently exceed $900 per unit.
Battery Chemistry Comparison
| Feature | Flooded Lead-Acid | Absorbent Glass Mat (AGM) | Lithium Iron Phosphate (LiFePO4) |
| Electrolyte State | Free-flowing liquid | Suspended in fiberglass mats | Solid-state lithium cells |
| Start-Stop Compatible | No | Yes | Yes (Excellent) |
| Vibration Resistance | Low | High | Extreme |
| Average Weight (H7) | 45 – 50 lbs | 51 – 57 lbs | 15 – 20 lbs |
| Estimated Lifespan | 3 – 5 Years | 4 – 7 Years | 8 – 10+ Years |
| Price Range | $120 – $160 | $200 – $300 | $850 – $1,100 |
Decoding the Ram 1500 eTorque System
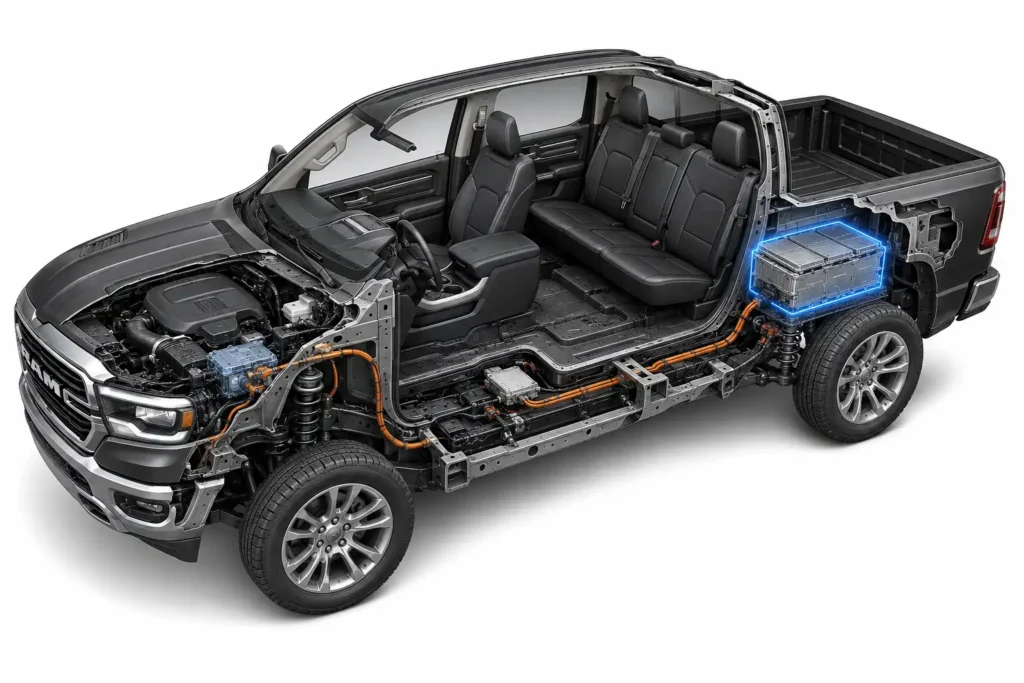
The introduction of the eTorque mild-hybrid system revolutionized the Ram 1500 powertrain. This system completely replaces the traditional alternator with a belt-driven motor-generator unit (MGU). The MGU assists the gasoline engine during initial acceleration, providing supplementary low-end torque.
This electric boost improves overall fuel efficiency and smooths out transmission shifts. The MGU also functions as a powerful generator, capturing kinetic energy during vehicle deceleration. This regenerative braking process rapidly recharges the system’s specialized battery network.
Unlike traditional full hybrids, the eTorque system cannot propel the truck on electric power alone. Instead, it operates silently in the background, managing the seamless start-stop functions. It bears the brunt of heavy accessory loads, reducing mechanical strain on the combustion engine.
eTorque Battery Location and Specifications
The absolute heart of the eTorque system is a specialized 48-volt battery pack. This unit utilizes advanced Lithium-Ion Nickel Manganese Cobalt (NMC)-Graphite cell chemistry. It is engineered specifically to handle thousands of rapid charge and discharge cycles daily.
To protect this sensitive component from harsh engine bay temperatures, Ram engineers relocated it. The 48-volt eTorque battery is securely mounted inside the climate-controlled cabin. Specifically, it is bolted to the rear wall of the cab, directly behind the rear passenger seats.
Operating at 48 volts, this system runs at electrical levels capable of causing severe injury. Diagnostic tests and electrical repairs on this circuit should be performed by trained professionals. It is completely electrically isolated from the standard 12-volt starting battery under the hood.
Differentiating the 12V and 48V Systems
A frequent point of confusion among Ram 1500 owners is the interplay between the two voltage systems. When an eTorque truck fails to start, owners often mistakenly condemn the expensive 48-volt battery. However, the 12-volt battery under the hood is still entirely responsible for basic vehicle initialization.
The 12-volt battery powers the vehicle’s computers, the interior electronics, and the starter relays. If the truck exhibits a rapid clicking sound but fails to crank, the 12-volt battery is the culprit. The 48-volt eTorque battery simply acts as an energy reservoir for the hybrid motor-generator.
If the 12-volt system dies completely, the 48-volt system cannot step in to jump-start the truck. It lacks the wiring pathways to power the basic ignition circuits independently. Therefore, diagnosing a no-start condition must always begin with testing the standard 12-volt AGM battery.
eTorque Warranty Coverage and Longevity
The 48-volt eTorque battery is a highly expensive component, causing anxiety for long-term owners. Fortunately, it benefits from robust, federally mandated warranty protections. Because it is classified as a hybrid component, it falls under the Federal Emissions Warranty.
This warranty provides comprehensive coverage for 8 years or 80,000 miles, whichever comes first. This coverage explicitly protects the power pack unit, the motor-generator, and the control modules. If the battery fails within this window, the replacement is fully covered by the manufacturer.
Despite this coverage, some dealerships have reportedly caused confusion regarding specific component verbiage. The terminology often changes between “Belt Driven Hybrid Starter Generator” and “Motor Generator Unit”. Owners must remain vigilant and reference their Federal Emissions Warranty documentation to avoid improper charges.
Diagnostics and Failure Symptoms
As the eTorque battery ages, its internal NMC-Graphite cell capacity gradually degrades. The average real-world lifespan of the 48-volt pack ranges from 3 to 5 years under heavy use. However, trucks operating in temperate climates often see lifespans exceeding seven years.
Symptoms of a failing eTorque system include sluggish engine cranking and erratic start-stop operation. Drivers may also experience an unexpected, brief power loss when merging or climbing steep hills. A distinct battery symbol may illuminate on the instrument cluster alongside a check engine light.
When the system detects a critical fault, it frequently displays a “System Unavailable” message. Diagnosing these hybrid issues requires access to proprietary dealership-level scan tools. Technicians must check individual lithium cell balance and verify bidirectional MGU operation.
Average Ram 1500 Battery Replacement Costs
Financial planning for a battery replacement requires understanding the split between physical parts and labor. The total cost fluctuates wildly based on the chosen battery chemistry and the truck generation. Understanding these variables helps owners avoid predatory pricing at repair facilities.
For standard non-hybrid models, the average cost for a professional battery replacement is quite moderate. Data indicates standard replacements range from $288 to $377 across the country. This figure combines the retail price of a basic battery with approximately half an hour of shop labor.
Newer models equipped with extensive electronics report significantly higher replacement costs. Repair data indicates that 2019-2023 Ram 1500 models frequently command between $810 and $1,009. This inflated price accounts for premium dealer-sourced AGM units, environmental fees, and diagnostic recalibrations.
Dealership vs. Independent Shop Labor Rates
Dealership service centers offer factory-trained technicians equipped with the latest software update tools. However, their specialized knowledge comes at a premium, with labor rates typically ranging from $150 to $200 per hour. Dealerships also tend to charge higher markups on OEM Mopar replacement batteries.
Independent repair facilities provide a more cost-effective alternative for routine maintenance. Independent shops generally charge between $37 and $85 for the labor involved in a standard battery swap. They can also source high-quality aftermarket batteries from brands like Odyssey or Interstate.
DIY installation completely eliminates labor costs, maximizing the owner’s financial savings. However, owners performing their own maintenance must possess the correct metric tools. They must also understand the required computer recalibration procedures to prevent system errors.
eTorque System Repair Costs
If the 48-volt eTorque battery falls outside the 8-year/80,000-mile warranty window, the financial burden is substantial. The specialized NMC-Graphite battery pack is a highly expensive, low-production line item. Owners should carefully budget for this eventual replacement if planning to keep the truck long-term.
A direct replacement of the 48-volt battery pack typically costs between $1,200 and $2,200. This price varies based on parts availability, shipping logistics, and regional dealer markups. Replacing the actual Motor Generator Unit (MGU) adds another $1,000 to $1,900 to the repair bill.
Furthermore, diagnostics alone for the hybrid system usually incur a preliminary fee of $150 to $250. Because the eTorque system utilizes high-voltage components, independent shops rarely tackle these repairs. Owners are generally forced to rely on dealership pricing for major hybrid component replacements.
Cost Analysis Matrix
| Component | Average Parts Cost | Average Labor Cost | Total Estimated Cost |
| 12V Flooded Battery | $150 – $180 | $50 – $80 | $200 – $260 |
| 12V AGM Battery | $220 – $300 | $50 – $100 | $270 – $400 |
| 12V Lithium Upgrade | $900 – $1,100 | $0 (DIY) | $900 – $1,100 |
| 48V eTorque Battery | $1,000 – $1,800 | $200 – $400 | $1,200 – $2,200 |
| 48V Motor Generator | $800 – $1,500 | $200 – $400 | $1,000 – $1,900 |
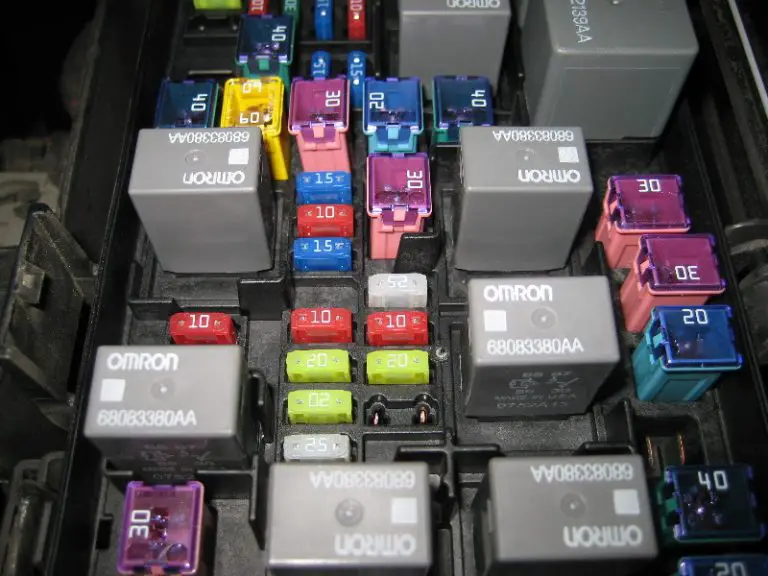
Essential Tools for DIY Battery Replacement
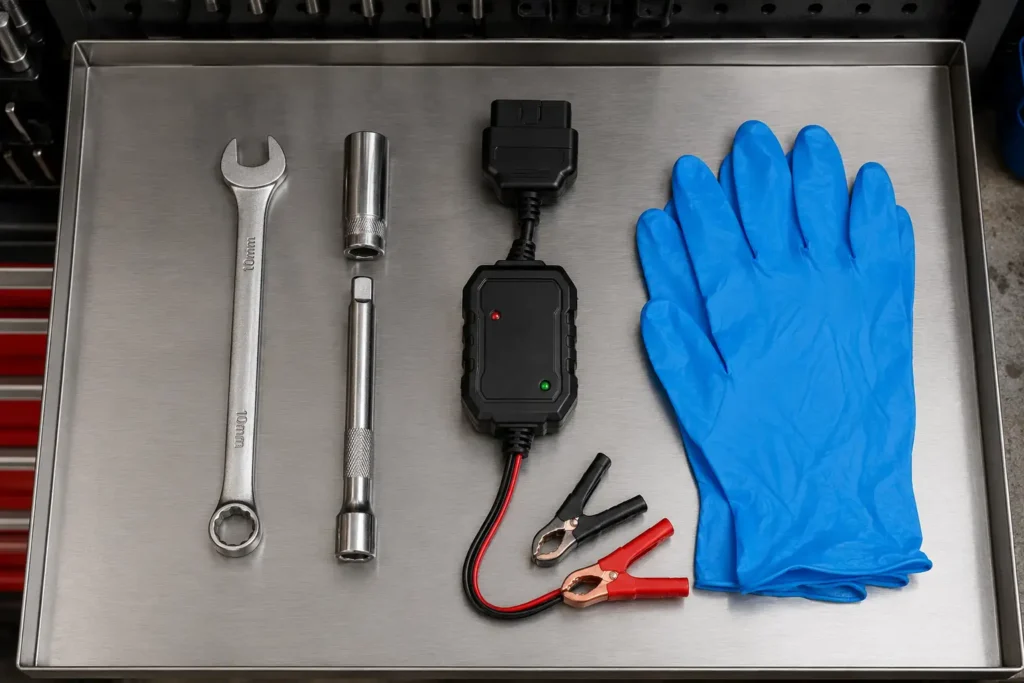
Executing a proper battery replacement at home requires more than just a pair of household pliers. Utilizing the correct tools prevents stripped bolts and minimizes the extreme risk of electrical shorts. Attempting this job with improper tools can cause thousands of dollars in vehicle damage.
A specialized 10mm socket or a metric combination wrench is required to loosen the terminal clamps. Using adjustable wrenches on battery terminals frequently rounds off the soft lead and zinc nuts. Precision is required to ensure the terminals can be tightened properly upon reinstallation.
Removing the battery hold-down bracket requires a 12mm or 13mm deep socket. This socket must be attached to a long ratchet extension, typically six to ten inches in length. The hold-down bolt sits deep within the battery tray, making it completely inaccessible with standard hand wrenches.
The Critical Role of OBD2 Memory Savers
Disconnecting the primary battery instantly severs all power to the vehicle’s electronic control units (ECU). This abrupt power loss erases radio presets, memory seat positions, and Bluetooth pairings. More importantly, it clears the engine’s idle learning parameters and adaptive transmission shift points.
An OBD2 memory saver prevents this data loss by bridging a secondary power source into the truck’s diagnostic port. These specialized devices utilize a small 12-volt auxiliary battery to keep the computer modules actively energized. They provide just enough amperage to sustain volatile memory without powering heavy components.
By plugging the memory saver into the OBD2 port beneath the steering column, technicians can safely remove the primary battery. Retailers like AutoZone provide these essential cables for under $30, making them highly accessible. Using a memory saver eliminates the need to visit a dealership for system re-initialization after a battery swap.
DIY Tool Checklist
| Tool Required | Specification | Purpose |
| Wrench / Socket | 10mm | Loosening positive and negative terminal clamps. |
| Deep Socket | 13mm | Reaching the deeply recessed hold-down bolt. |
| Socket Extension | 6-inch to 10-inch | Providing clearance above the battery case. |
| Memory Saver | OBD2 to 12V adapter | Preventing ECU data loss during the swap. |
| Safety Gear | Goggles and nitrile gloves | Protection against corrosive sulfuric acid. |
Step-by-Step Ram 1500 Battery Replacement Procedure
Safety is the absolute paramount concern when handling any automotive power storage device. Lead-acid batteries naturally emit explosive hydrogen gas and contain highly corrosive sulfuric acid. A single spark near the battery vents can trigger a catastrophic casing explosion.
The vehicle must be parked on a perfectly level surface to prevent rolling during the procedure. Ensure the ignition is completely switched off, the keys are removed, and the parking brake is firmly engaged. Technicians must wear protective gloves and wrap-around safety glasses throughout the entire process.
Furthermore, all metal jewelry, including rings and watches, must be removed. A dropped wrench bridging the positive and negative terminals will instantly melt the tool and cause severe burns. Meticulous attention to detail is required to ensure a safe and successful installation.
Step 1: Connecting the Memory Saver
Before opening the hood, connect the OBD2 memory saver cable to the vehicle’s diagnostic port. The other end of the cable should be connected to a fully charged 12-volt jump pack or auxiliary battery. Ensure the connection is secure and the cables are not resting on the vehicle pedals.
Confirm that the memory saver’s LED indicator is illuminated, signifying a stable power connection. Ensure all interior lights, radios, and HVAC fans are turned completely off. High electrical draws will blow the small fuse inside the memory saver cable, defeating its purpose.
With the memory saver active, the positive battery cable will remain electrically “live” even after disconnection. Technicians must wrap the positive terminal in a heavy rubber glove or thick rag immediately upon removal. This prevents the live terminal from grounding against the chassis and causing a massive short circuit.
Step 2: Disconnecting the Terminals
Always begin the physical removal process by disconnecting the negative (black) battery cable first. Use a 10mm wrench to loosen the clamping nut, then gently twist and pull the terminal off the battery post. Never pry the terminal off with a screwdriver, as this can crack the battery casing.
Removing the negative terminal first eliminates the risk of an accidental ground loop short circuit. If a tool touches the chassis while unbolting the negative terminal, nothing happens because the chassis is already grounded. Tuck the negative cable safely down into the engine bay, away from the battery post.
Next, carefully loosen the 10mm nut on the positive (red) terminal. Lift the positive terminal away and immediately wrap it in an insulating material. Keep this wrapped terminal suspended away from any bare metal surfaces in the engine bay.
Step 3: Removing the Hold-Down Mechanism
The Ram 1500 utilizes a specific heavy-duty hold-down bracket to secure the battery against off-road vibrations. This wedge bracket is clamped tightly to the base of the plastic battery tray using a long bolt. Without this bracket, the battery would bounce violently, causing internal plate damage.
The standard OEM hold-down bolt is a 1/4″-20 x 9″ threaded fastener. Use a 13mm deep socket attached to a long extension to reach down and loosen this specific bolt. Turn the bolt counter-clockwise until the bracket is completely free from the tray.
Carefully extract the bolt and the metal wedge bracket from the engine bay and set them aside. Because Ram 1500 H7 and H8 batteries can weigh over 50 pounds, use proper lifting techniques. Grip the integrated plastic handles and lift the old unit straight up and out of the tray using your legs.
Step 4: Installing the New Battery
Inspect the empty plastic battery tray for any signs of acid damage, corrosion, or trapped debris. Carefully lower the new BCI Group 94R (or 49) battery into the tray, ensuring proper orientation. The battery must sit completely flat and should not wobble when lateral pressure is applied.
Reinsert the metal hold-down wedge bracket at the base of the battery. Thread the 9-inch securing bolt back into the tray by hand to prevent cross-threading. Tighten the 13mm bolt with your ratchet until the battery is firmly locked in place; it should be completely immobile.
Remove the insulating rag from the positive cable and firmly seat the terminal onto the new positive post. Tighten the 10mm nut securely, ensuring the clamp cannot be rotated by hand. Applying a thin layer of dielectric grease at this stage will prevent future corrosion.
Step 5: Finalizing the Connection
Attach the negative (black) cable to the negative battery post last to complete the circuit. Tighten the 10mm nut firmly, taking care not to over-torque and snap the delicate clamp mechanism. Double-check both terminals by giving them a firm tug; they must be absolutely rock solid.
Once the physical installation is complete, remove the OBD2 memory saver from the cabin diagnostic port. Start the engine and allow it to idle smoothly for several minutes without touching the accelerator. This ensures the alternator is properly charging the new unit and the ECU has maintained its memory.
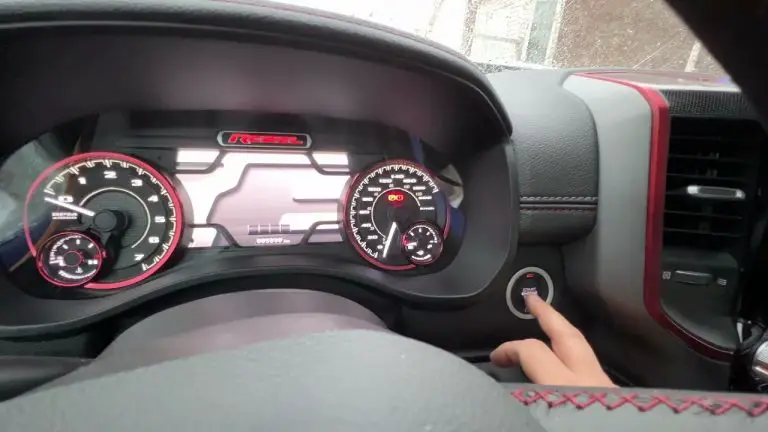
Check the instrument cluster for any residual warning lights or error messages. If the truck is equipped with an Intelligent Battery Sensor, proceed immediately to the BMS calibration steps. Failing to calibrate the sensor will result in disabled start-stop functionality.
Understanding the Intelligent Battery Sensor (IBS)
Modern Ram 1500s employ an Intelligent Battery Sensor (IBS) to meticulously monitor electrical health. This highly sensitive module is clamped directly to the negative battery terminal. The IBS continuously measures microscopic changes in voltage, current flow, and ambient battery temperature.
This sensor transmits its real-time data via a Local Interconnect Network (LIN) bus. The data is sent directly to the vehicle’s Body Control Module (BCM) for processing. The BCM utilizes this precise data to optimize the alternator’s output and manage the automatic start-stop system.
If the IBS detects that the battery’s State of Charge (SOC) has dropped below a critical threshold, it acts defensively. The computer will aggressively disable non-essential features, starting with the idle start-stop system. This electrical triage guarantees the battery retains enough reserve power to crank the engine.
Why the IBS Requires Precise Calibration
When a new battery is installed, the IBS does not automatically realize that electrical capacity has been restored to 100%. The sensor’s internal algorithms still fiercely remember the degraded voltage profile of the old battery. It assumes the electrical system is still operating in a compromised, low-capacity state.
Without a manual reset or a proper learning cycle, the system will manage the new battery incorrectly. It may chronically overcharge the new battery or trigger erratic, unpredictable start-stop behavior. The IBS requires a strict recalibration period to assess the true State of Health (SOH) of the fresh power source.
This calibration establishes accurate linear reference points between a completely full charge and a completely empty state. Automotive engineers refer to this highly technical process as SOC adaptation or impedance tracking. Without accurate impedance tracking, the vehicle’s digital fuel gauge for the battery is effectively blind.
The Quiescent Sleep Period Explained
The most critical element of successful IBS calibration is achieving a true “quiescent” state. A quiescent period is strictly defined as a deep sleep phase where the vehicle is entirely powered down and locked. During this phase, the vehicle cannot be disturbed by any external inputs.
During this deep sleep, the parasitic current flowing through the battery must stabilize at an ultra-low level. Specifically, the current must remain strictly between -500mA and 50mA. If a door is opened, or a key fob approaches the vehicle, modules awaken and instantly disrupt the quiescent state.
To properly adapt to a new battery, the Ram 1500 requires a specific sequence of events. It needs a minimum of one engine crank followed by an uninterrupted 2 to 4 hours of quiescent sleep time. Only after this pristine sleep period will the IBS register the new battery’s maximum capacity.
| Reset Method | Required Steps | Time Required | Efficacy |
| Automatic (Sleep) | Lock truck, keep fob far away, ensure absolutely no module activity. | 2 to 4 hours minimum | High |
| Manual (No Tool) | Disconnect negative 15m, reconnect, IGN RUN, press accelerator 15s. | 20 minutes | Medium |
| Hard Reboot | Unplug IBS 2-way connector to clear stubborn B2193 DTCs. | 30 seconds | High |
Advanced IBS Troubleshooting and Error Codes
On rare occasions, the IBS software may encounter an internal monitoring defect during normal operation. This defect triggers a Diagnostic Trouble Code (DTC) B2193 within the vehicle’s BCM. This specific defect completely disrupts LIN bus communication, effectively blinding the vehicle’s charging logic.
This is often accompanied by a U113E diagnostic code, indicating a total loss of sensor communication. Before replacing the expensive sensor, technicians should attempt a hard power reboot. Disconnecting the small 2-way wiring harness from the IBS, waiting 30 seconds, and reconnecting it can clear the fault.
If the U113E code persists after a reboot, technicians must engage in deeper electrical diagnostics. They must back-probe pin 2 on the IBS connector to verify it receives a full 11.8+ volts. A chewed wire from rodents or a blown IBS feed fuse (Fuse 52) will instantly disable the start-stop architecture.
Advanced Maintenance: Cleaning Battery Terminal Corrosion

The physical interface between the battery posts and the terminal clamps is the most vulnerable point in the electrical system. Microscopic gaps in the battery casing allow highly corrosive sulfuric acid fumes to escape into the engine bay. These caustic fumes react violently with the surrounding lead, copper, and zinc components.
This chemical reaction produces a crusty, highly resistive buildup of lead oxide and copper sulfate. As this colorful corrosion accumulates, it acts as a severe electrical insulator blocking current flow. This insulation drops cranking voltage drastically, often mimicking the symptoms of a completely dead battery.
Routine terminal cleaning is a vital preventative measure that extends battery life and ensures optimal IBS sensor readings. Utilizing simple household chemical reactions is the safest and most effective method for total corrosion removal. Mechanical scraping alone is insufficient, as it leaves microscopic acidic residues behind.
The Baking Soda and Water Method
Baking soda, scientifically known as sodium bicarbonate, is a highly effective, mild alkaline compound. Because battery corrosion is fiercely acidic, baking soda acts as a perfect chemical neutralizing agent. It is the preferred method for safe, thorough cleaning in professional automotive environments.
To clean the terminals effectively, mix one tablespoon of baking soda with one tablespoon of water. Stir the mixture until it forms a thick, spreadable paste. Apply this paste generously over the corroded terminals and cable ends using an old toothbrush.
The paste will bubble and fizz violently as it rapidly neutralizes the dangerous acid. Once the fizzing subsides, scrub the terminals vigorously with a stiff wire brush. The goal is to expose the bare, shiny metal beneath the crust, ensuring perfect electrical conductivity.
The Vinegar Application Technique
White vinegar contains acetic acid, making it an alternative solvent for breaking down complex rust deposits. It is particularly useful for light corrosion on smaller battery contacts found in key fobs. Some technicians swear by vinegar for dissolving heavily crystallized copper sulfate on older trucks.
However, applying an acid to an already acidic battery leak is chemically less optimal than neutralizing it. Vinegar is highly effective at dissolving the crust, but it requires meticulous, heavy rinsing with distilled water. Failing to rinse the vinegar away completely creates a new set of long-term problems.
If any vinegar residue remains trapped beneath the terminal clamps, it will attract atmospheric moisture. This trapped moisture will rapidly accelerate future oxidation, compounding the corrosion issue. Therefore, the baking soda buffering method remains the industry’s preferred and safest technique.
Finalizing the Cleaning Process
Once the heavy corrosion has been scrubbed away entirely, the cleanup phase begins. Rinse the entire battery top and the surrounding tray with a slow, controlled pour of distilled water. Distilled water is crucial because it lacks the mineral impurities found in tap water that could bridge electrical connections.
Wipe the terminals and the battery casing completely dry using clean shop towels. Trapped moisture is the absolute enemy of DC electrical systems and must be eliminated. Ensure the plastic battery tray is also completely devoid of any standing water or acid residue.
To definitively prevent future oxidation, coat the exposed metal terminals with a protective barrier. Apply a thin layer of petroleum jelly (Vaseline) or a specialized automotive dielectric grease. This hydrophobic layer seals out oxygen and acidic fumes, preserving the clean connection for years.
Safe Jump-Starting Procedures for Ram 1500
Despite advanced battery technologies, parasitic drains or leaving headlights illuminated will inevitably drain a battery. Jump-starting a modern Ram 1500 requires strict adherence to precise safety protocols. Failing to follow these steps can easily fry delicate ECUs or trigger an explosion.
Park the rescue vehicle close enough to the Ram so the cables reach comfortably with slack. Ensure the vehicles absolutely do not touch physically, as this can create a dangerous ground loop. Turn off the ignition on both vehicles completely and engage the parking brakes firmly.
Identify the positive (red) and negative (black) terminals on both vehicle batteries carefully. On eTorque models, jump-starting is exclusively performed on the standard 12-volt battery under the hood. Never attempt to jump-start or connect jumper cables to the 48-volt system behind the rear seats.
Proper Jumper Cable Sequencing
Attach the first red clamp securely to the positive terminal of the dead Ram 1500 battery. Ensure the jagged teeth of the clamp bite firmly into the metal to prevent dangerous arcing. Loose connections will melt the jumper cable insulation rapidly due to extreme resistance.
Connect the opposite red clamp to the positive terminal of the fully charged rescue battery. Next, connect the first black clamp to the negative terminal of the good, charged rescue battery. Never let the unattached black clamp touch any metal surfaces while completing this sequence.
Finally, attach the last black clamp to an unpainted, grounded metal surface on the Ram 1500’s engine block. Connecting this final negative clamp directly to the dead battery risks igniting escaping hydrogen gas with a spark. Start the rescue vehicle, idle it slightly above normal RPM, and then attempt to start the Ram 1500.
Critical Ram 1500 Battery Questions (FAQ)
What exact battery does a 2019+ Ram 1500 take?
Most 2019 and newer Ram 1500s equipped with the 5.7L HEMI or 3.6L Pentastar require a BCI Group 94R (H7) AGM battery. These specialized AGM units provide the optimal 800+ CCA necessary to support modern start-stop electrical loads and infotainment systems.
How do you reset the Battery Management System on a Ram 1500?
The BMS (or IBS) resets automatically after a battery change if the vehicle is locked and left undisturbed in a quiescent sleep state for 2 to 4 hours. Alternatively, disconnecting the negative terminal for 15 minutes, turning the ignition to RUN, and holding the accelerator for 15 seconds forces a manual adaptation.
Does the Ram 1500 eTorque genuinely have two batteries?
Yes. The eTorque system utilizes a traditional 12-volt lead-acid battery under the hood for initial starting and accessory power. Alongside this, it uses a specialized 48-volt Lithium-Ion NMC battery pack mounted behind the rear seats to power the mild-hybrid motor-generator.
How much does it cost to replace the 48V eTorque battery?
Replacing the 48-volt eTorque battery completely out-of-pocket costs between $1,200 and $2,200 for parts and labor at a dealership. However, this highly expensive component is covered under the 8-year/80,000-mile Federal Emissions Warranty for any manufacturing defects.
What size is the Ram 1500 battery hold-down bolt?
The standard Ram 1500 battery hold-down bolt utilizes a 1/4″-20 thread pitch and is exactly 9 inches in length. Extracting this deeply recessed bolt requires a 13mm deep socket attached to a long ratchet extension.
Can a dead 12V battery cause the 48V eTorque system to fail?
Absolutely. If the primary 12-volt battery under the hood fails, the truck’s main computers cannot initialize the ignition sequence. The vehicle will simply click and will not start, regardless of the maximum charge level stored in the 48-volt eTorque hybrid battery.
Why did my auto start-stop system stop working after a battery swap?
The Intelligent Battery Sensor (IBS) requires an uninterrupted period of ultra-low current draw (-500mA to 50mA) to calibrate the new battery’s State of Charge. Without this pristine 4-hour adaptation period, the computer defensively disables start-stop to protect the uncalibrated electrical network.
What specific size battery does the 3.0L EcoDiesel require?
The 3.0L EcoDiesel Ram 1500 demands a physically larger BCI Group 49 (H8) AGM battery due to massive cranking demands. The high cylinder compression of the diesel engine mandates the extreme 900-950 CCA output provided by the extended H8 battery casing.
What is an OBD2 memory saver and why is it required?
An OBD2 memory saver is a polarized jumper cable bridging a small 12-volt backup battery directly into the vehicle’s diagnostic port. It keeps the ECUs energized during a battery swap, preventing the catastrophic loss of radio presets, clock settings, and adaptive transmission learning data.
How do I safely clean thick corrosion off my battery terminals?
Mix one tablespoon of household baking soda with water to form a highly effective alkaline neutralizing paste. Apply this bubbling paste to the terminals to dissolve the acidic lead oxide, scrub violently with a wire brush, and rinse the area thoroughly with pure distilled water.


![Bilstein 5100 Ram 1500 [2026]](https://truckguider.com/wp-content/uploads/2026/03/bilstein-5100-ram-1500-featured.webp)

![2021 Ram 1500 Battery Replacement: Specs & Expert Tips [2026]](https://truckguider.com/wp-content/uploads/2026/03/2021-ram-1500-battery-replacement-featured-768x403.webp)